How to make table lamp

Lighting is one of my favorite idea which pops up in my mind whenever I plan to decorate my house for any party. From fairy lights to night bulbs these can be used in many ways to light up the mood. Recently I was planning to buy a night lamp for my side table, I browsed through many online shops and got bored as I am too reckless whenever it comes to online shopping..I closed my laptop and thought of doing my laundry chores…and in this process I got an old box which gave me a terrific idea, an idea to make a table lamp.

Some of the most memorable designs are born more out of necessity than creativity. Working with the materials at hand rather than going out in search of something new can produce spectacularly creative results.

I love to use items that we see every day, this beautiful table lamp incorporates recycled materials and the result is some truly impressive illumination.


At times, the recycled materials and the finished product have equal importance, such as in the cases of this recycled lamp. Doing something similar with your kids can be a fun activity too.

TRY IT OUT:

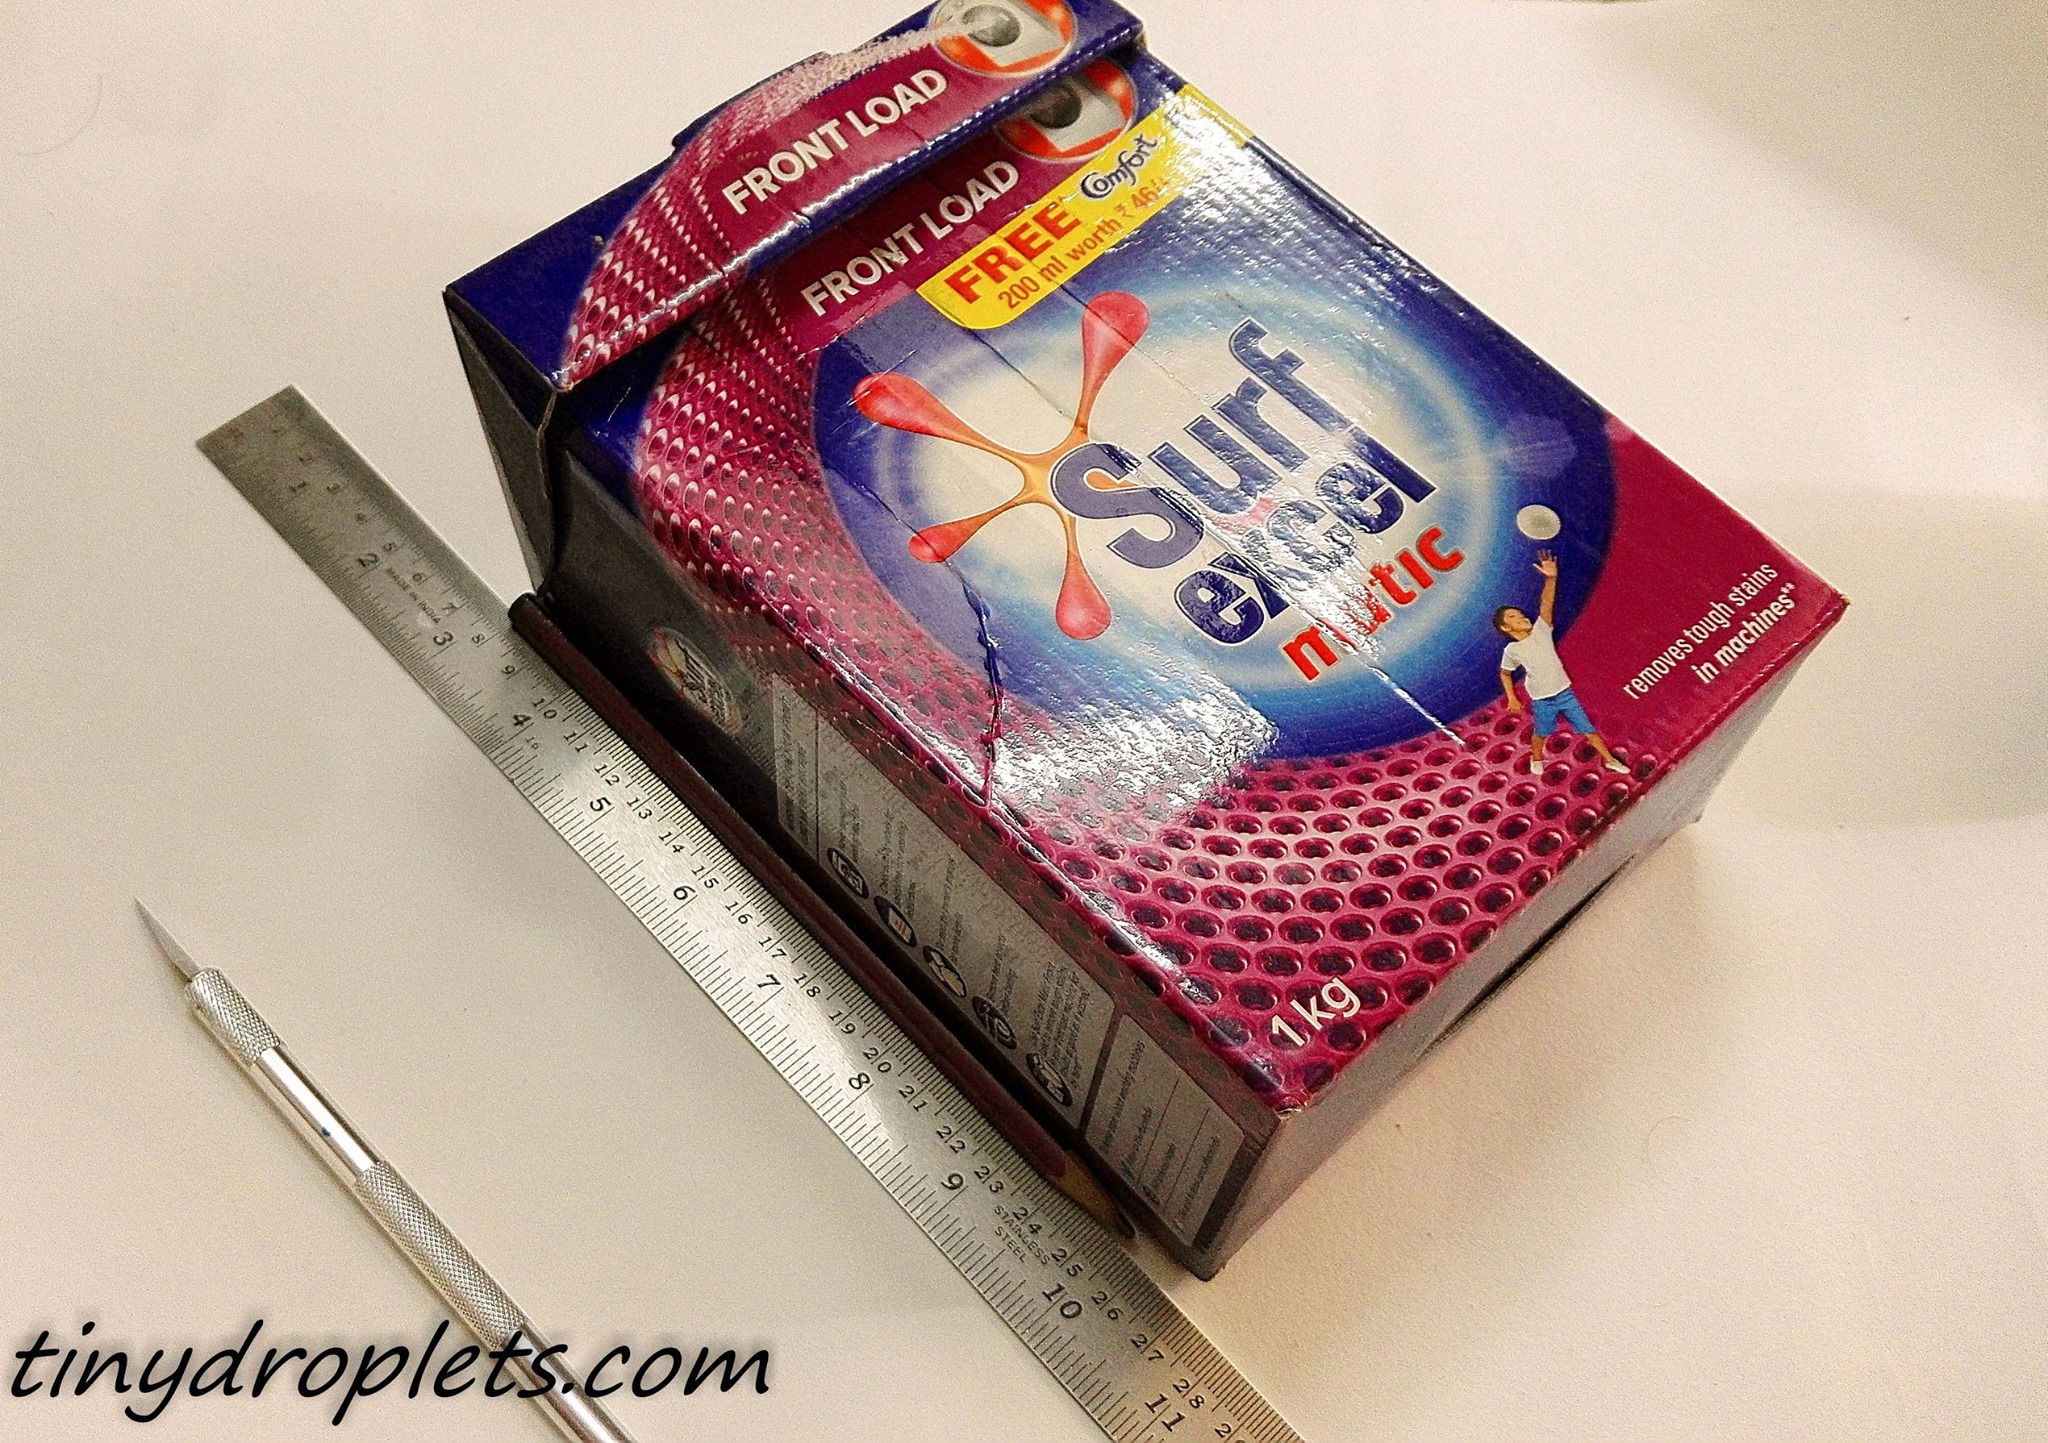
For this project you need: cardboard box,scissor,glue,scale,x acto blade, A4 sheet,craft paper,colors,printed buddha design,bulb with holder and thermocol sheet.

Get an old box, I had this one at my disposal…

.


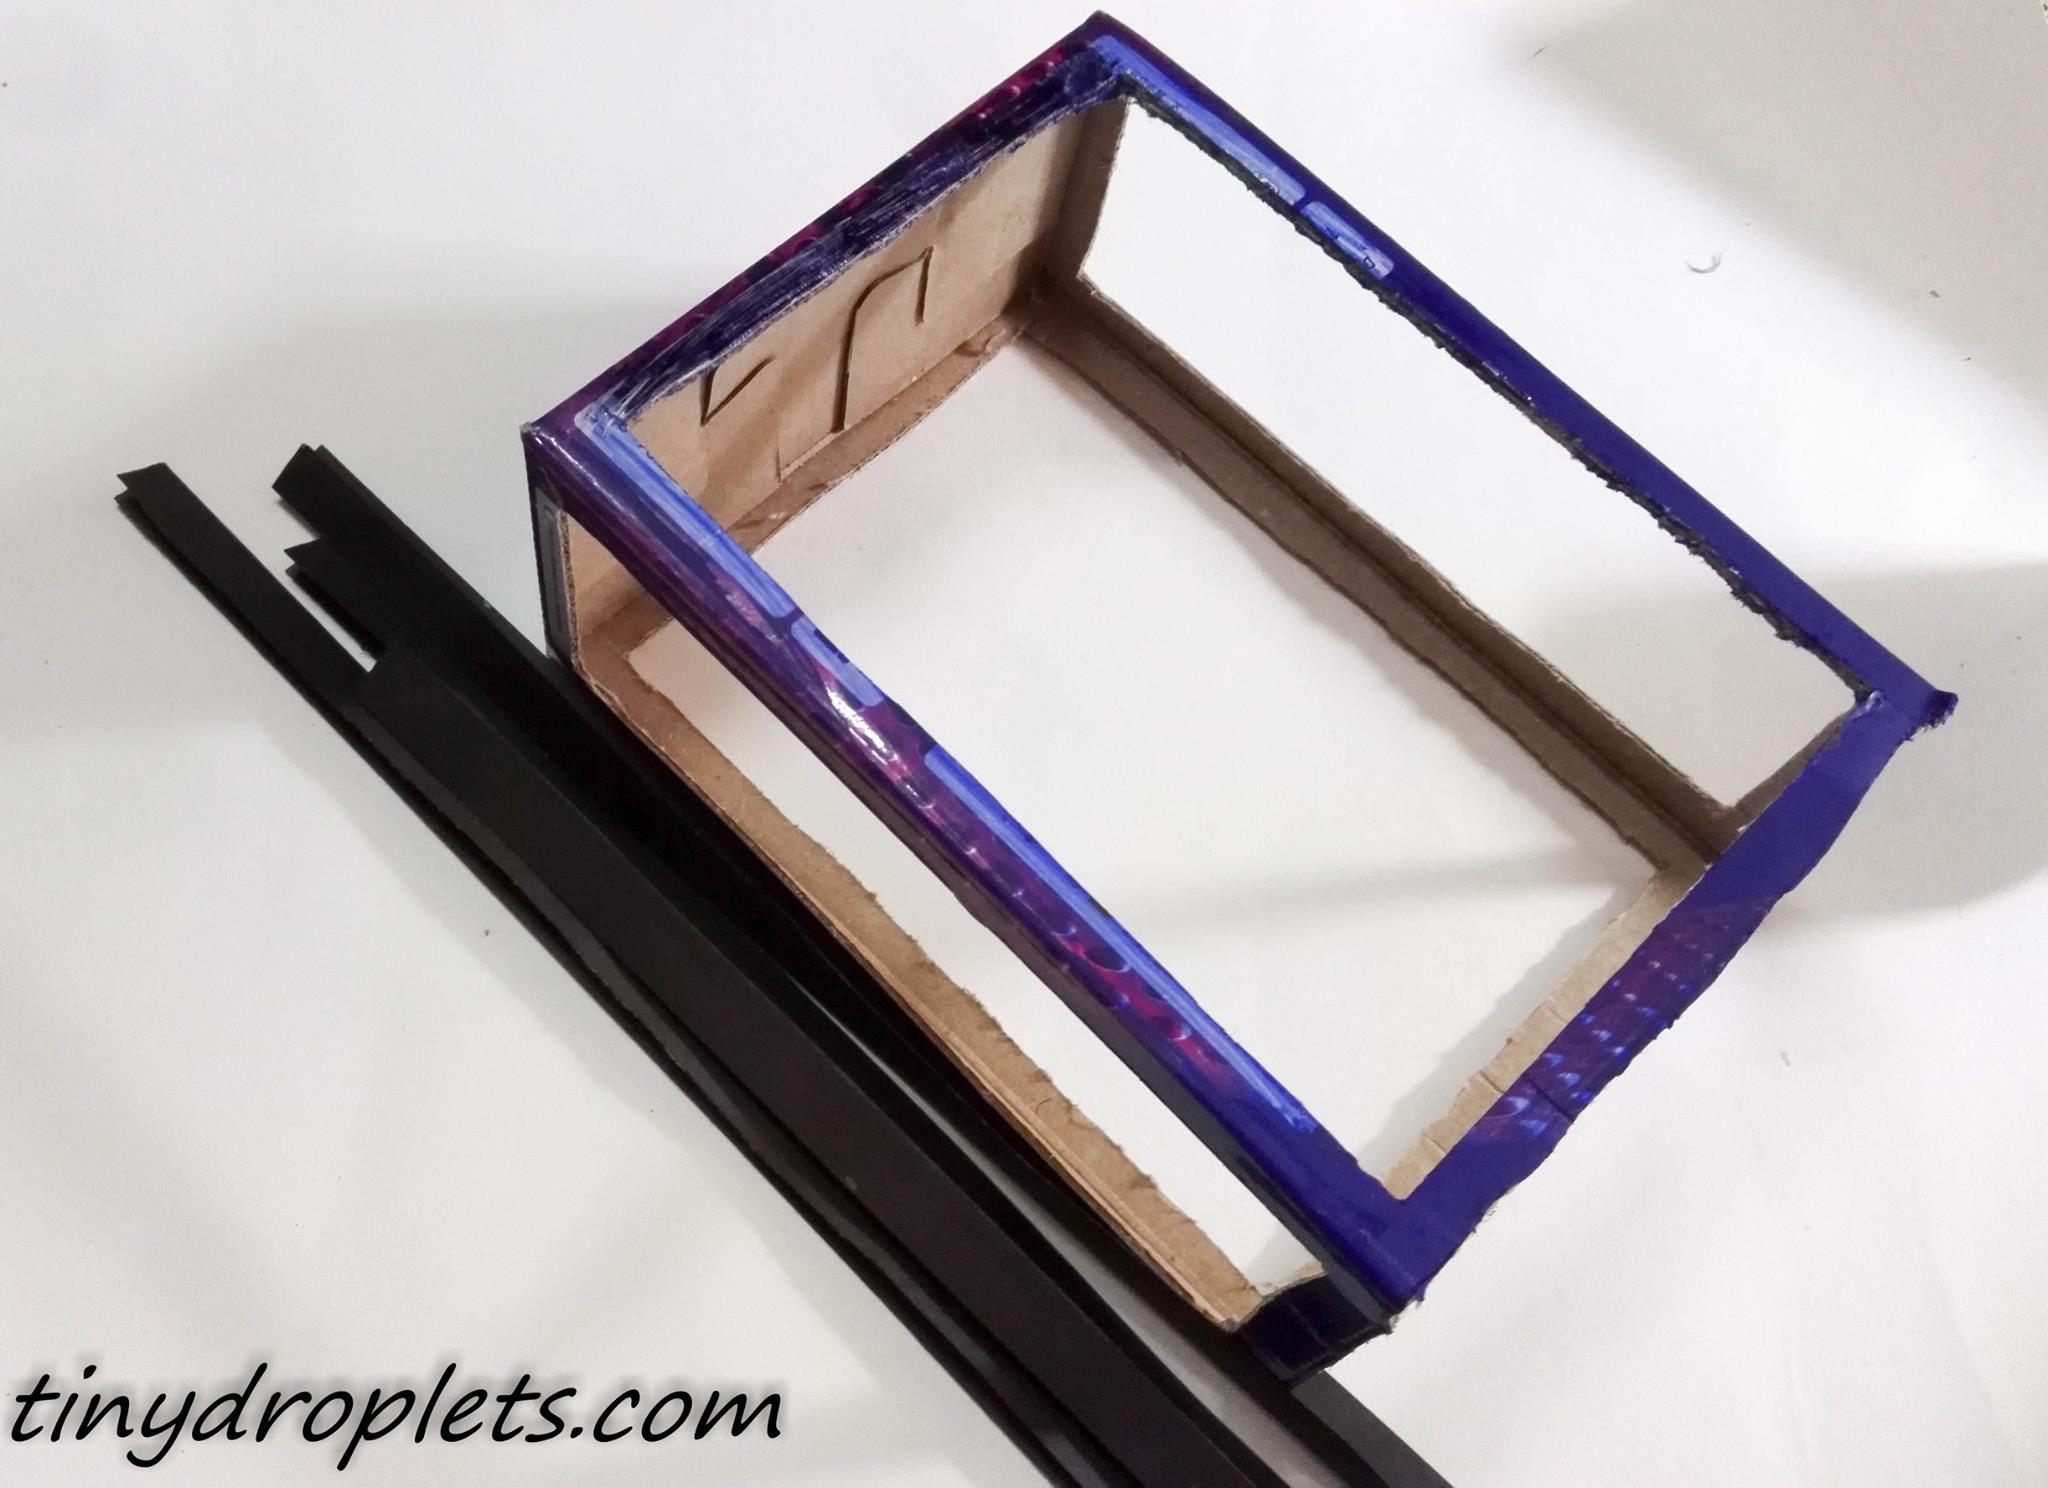
Start marking on all the sides and using an x-acto blade start cutting. I have removed the lid first, make sure cuts are fine. Box should look as shown below..


This is going to form the frame, over which we will be gluing our design. But before that cut long paper strips, color it using black water color. Make sure the  strips covers the corners completely.


Glue the strips and let it dry. Once this is done use plain white A4 sheet to cover the sides of the frame. Use plane sheet on backside,side wards and on top. Leave the base and front portion open. Your box should look like this.


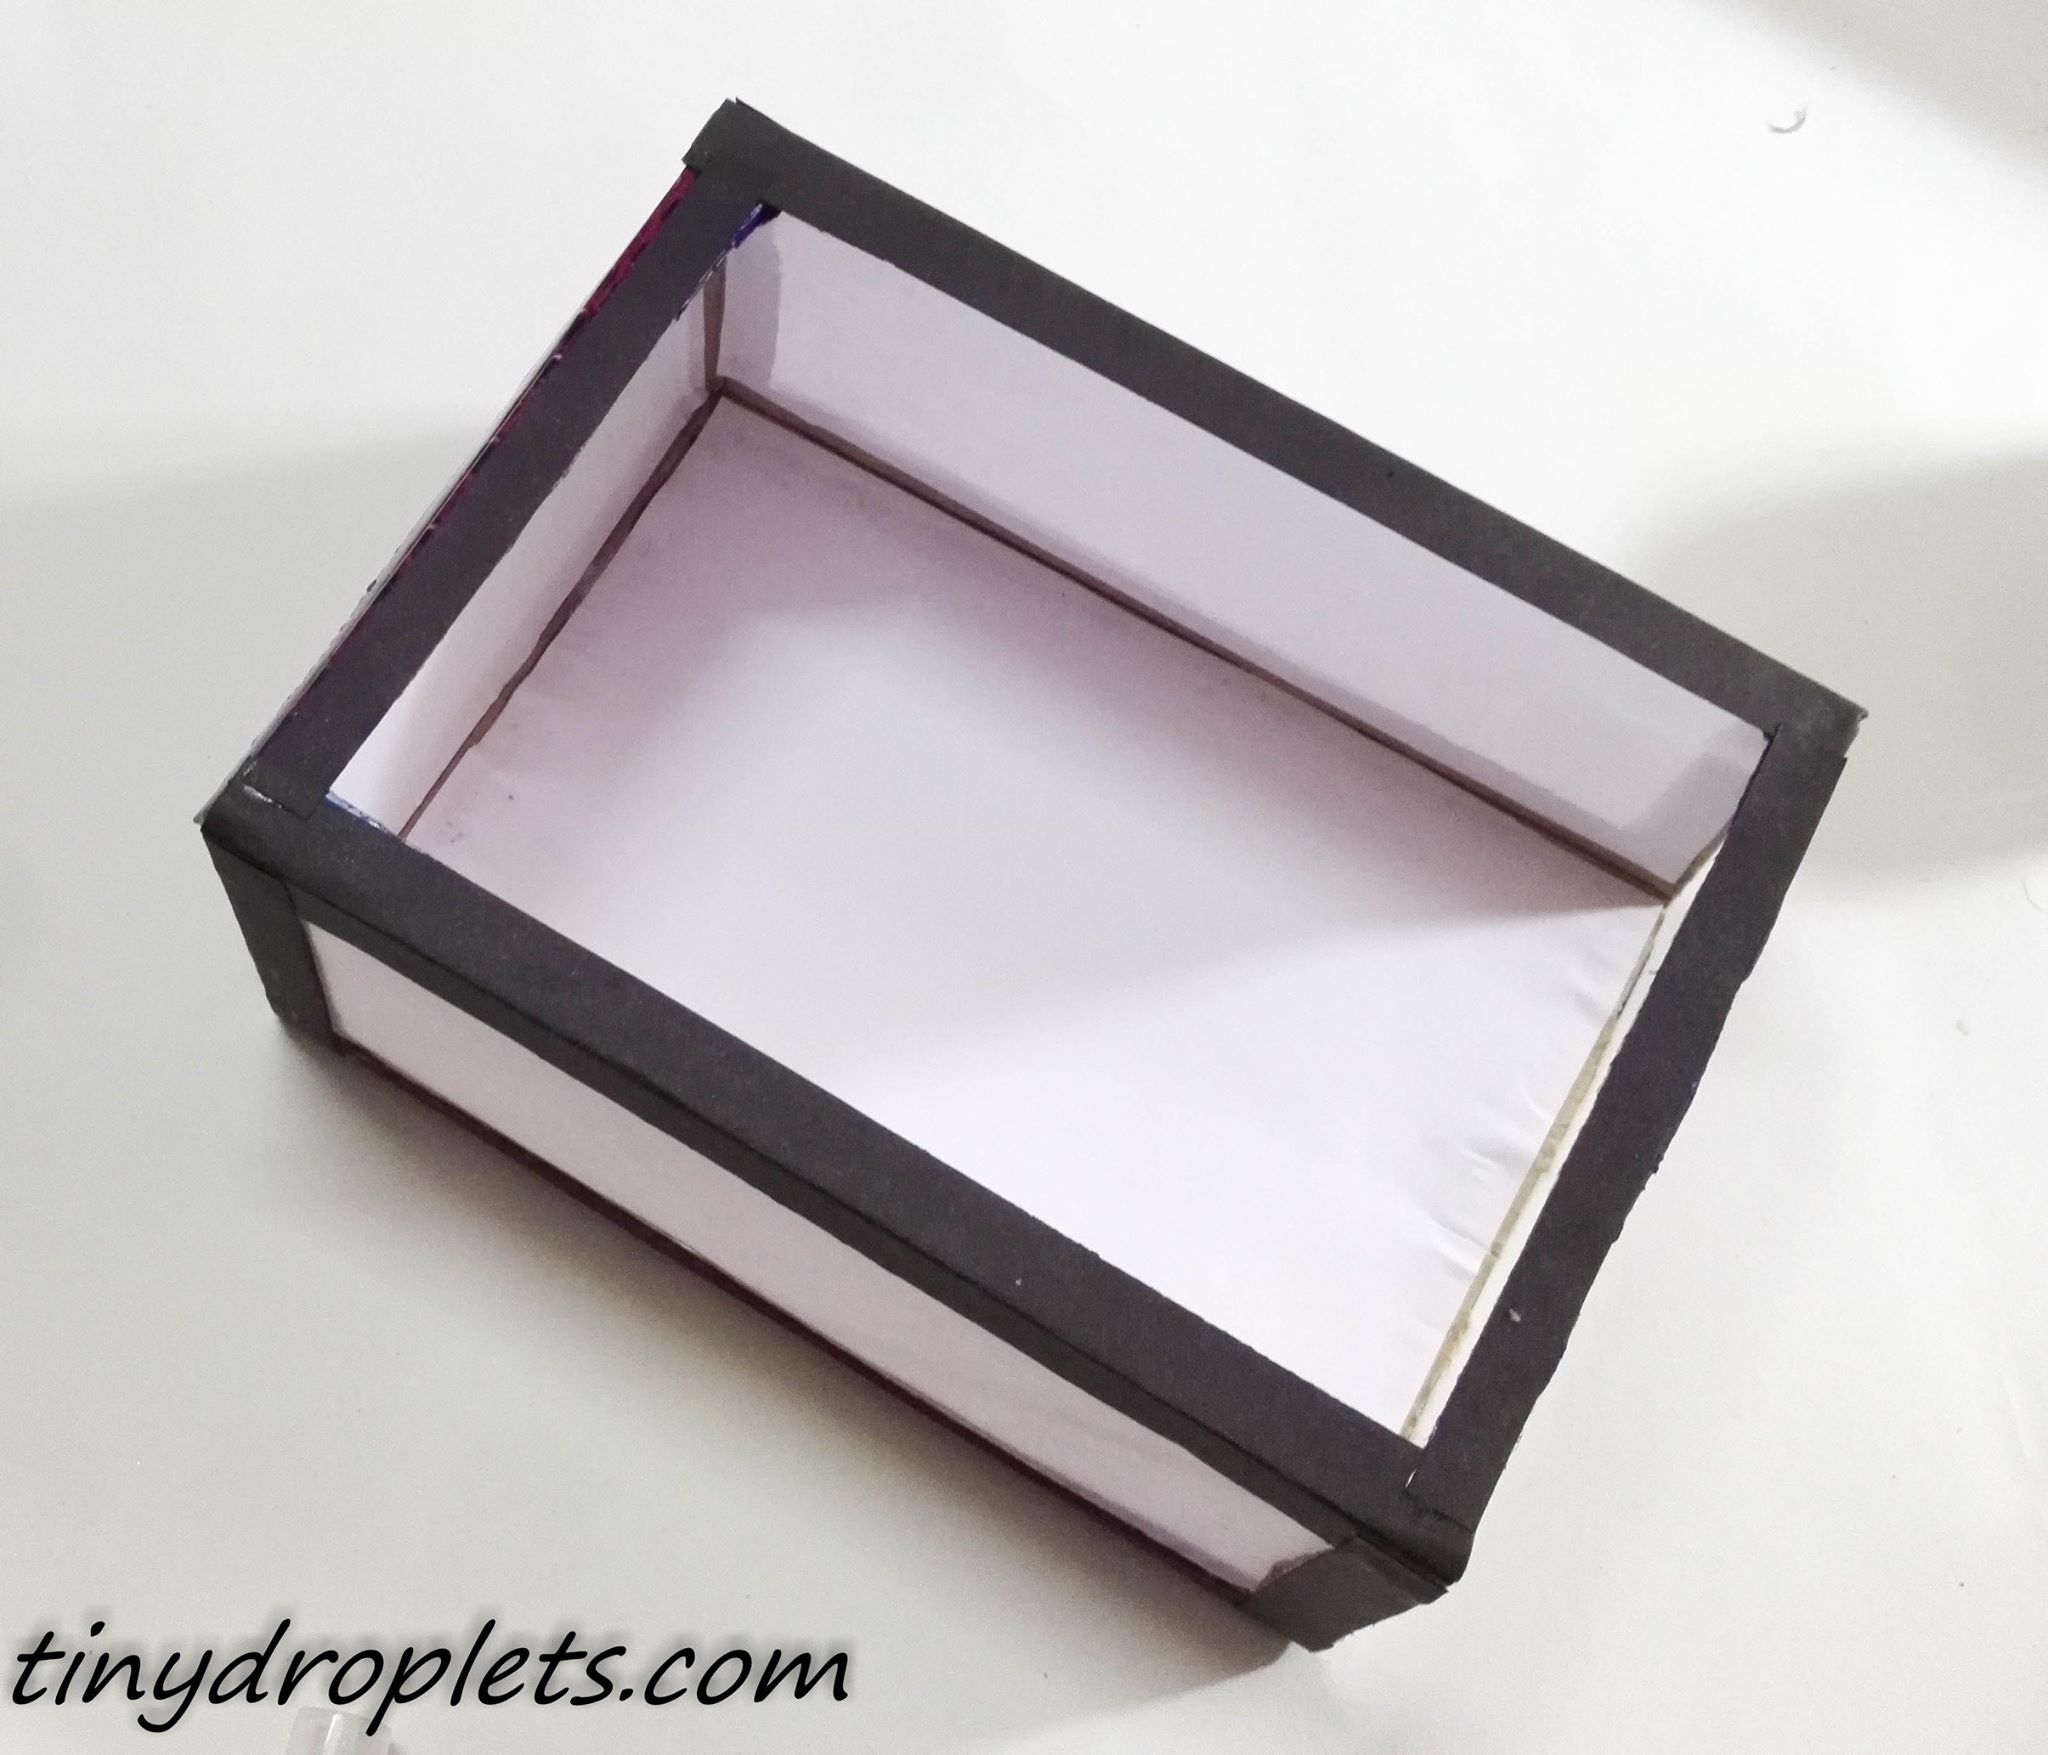
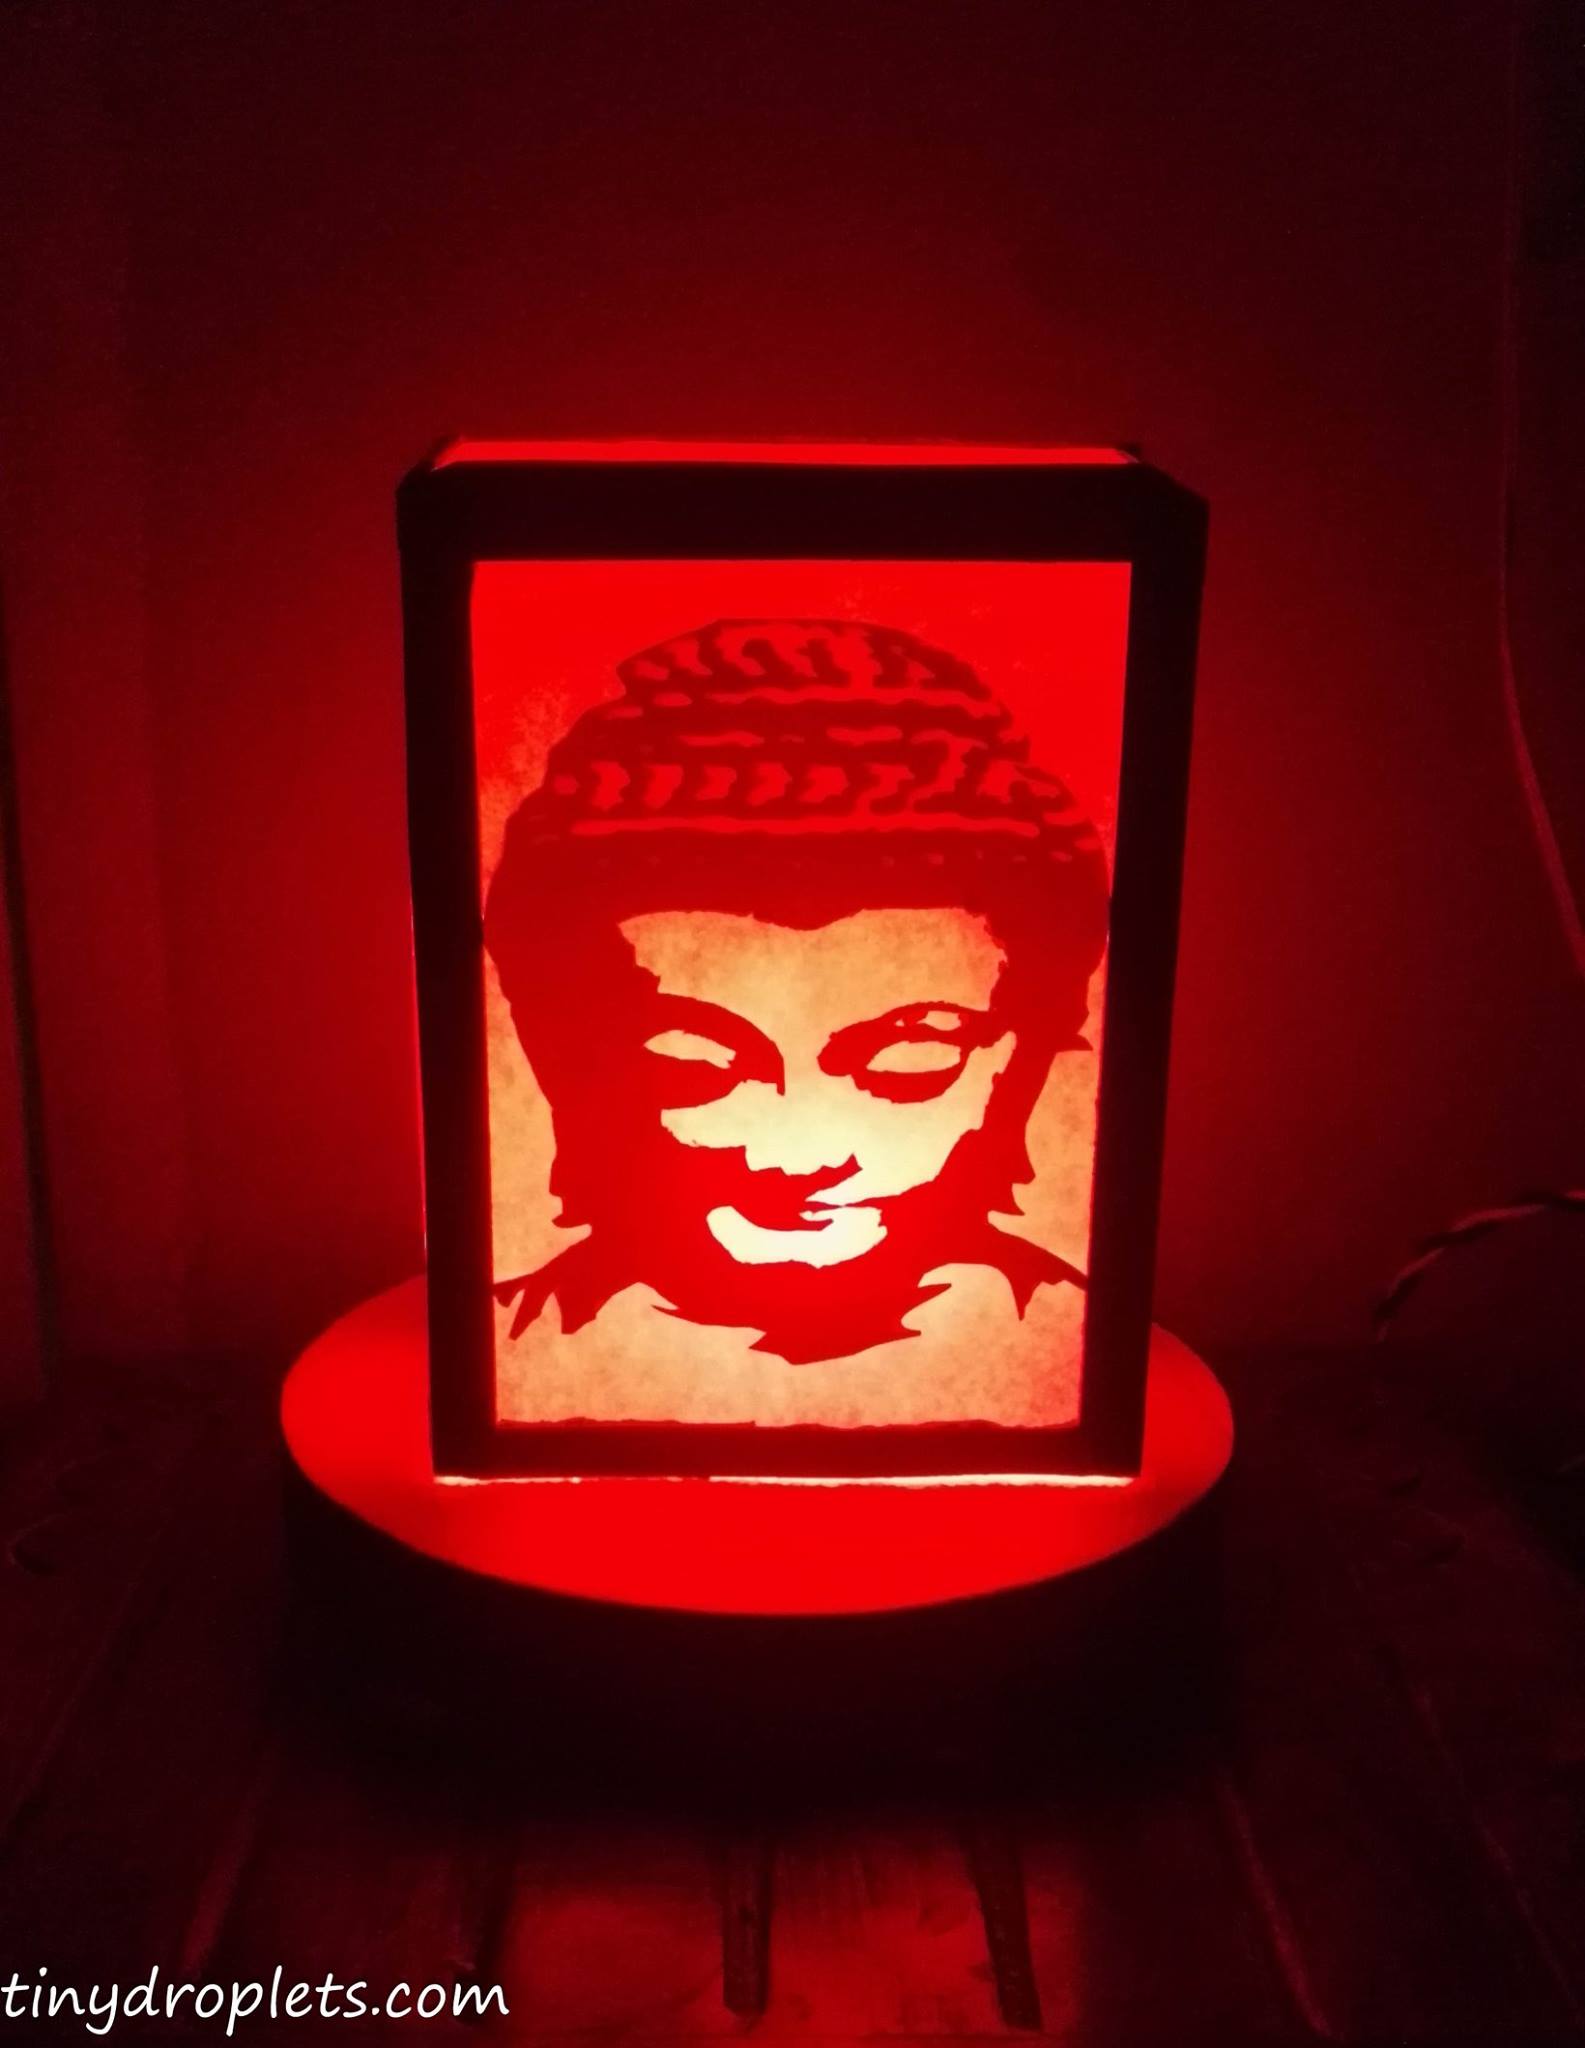
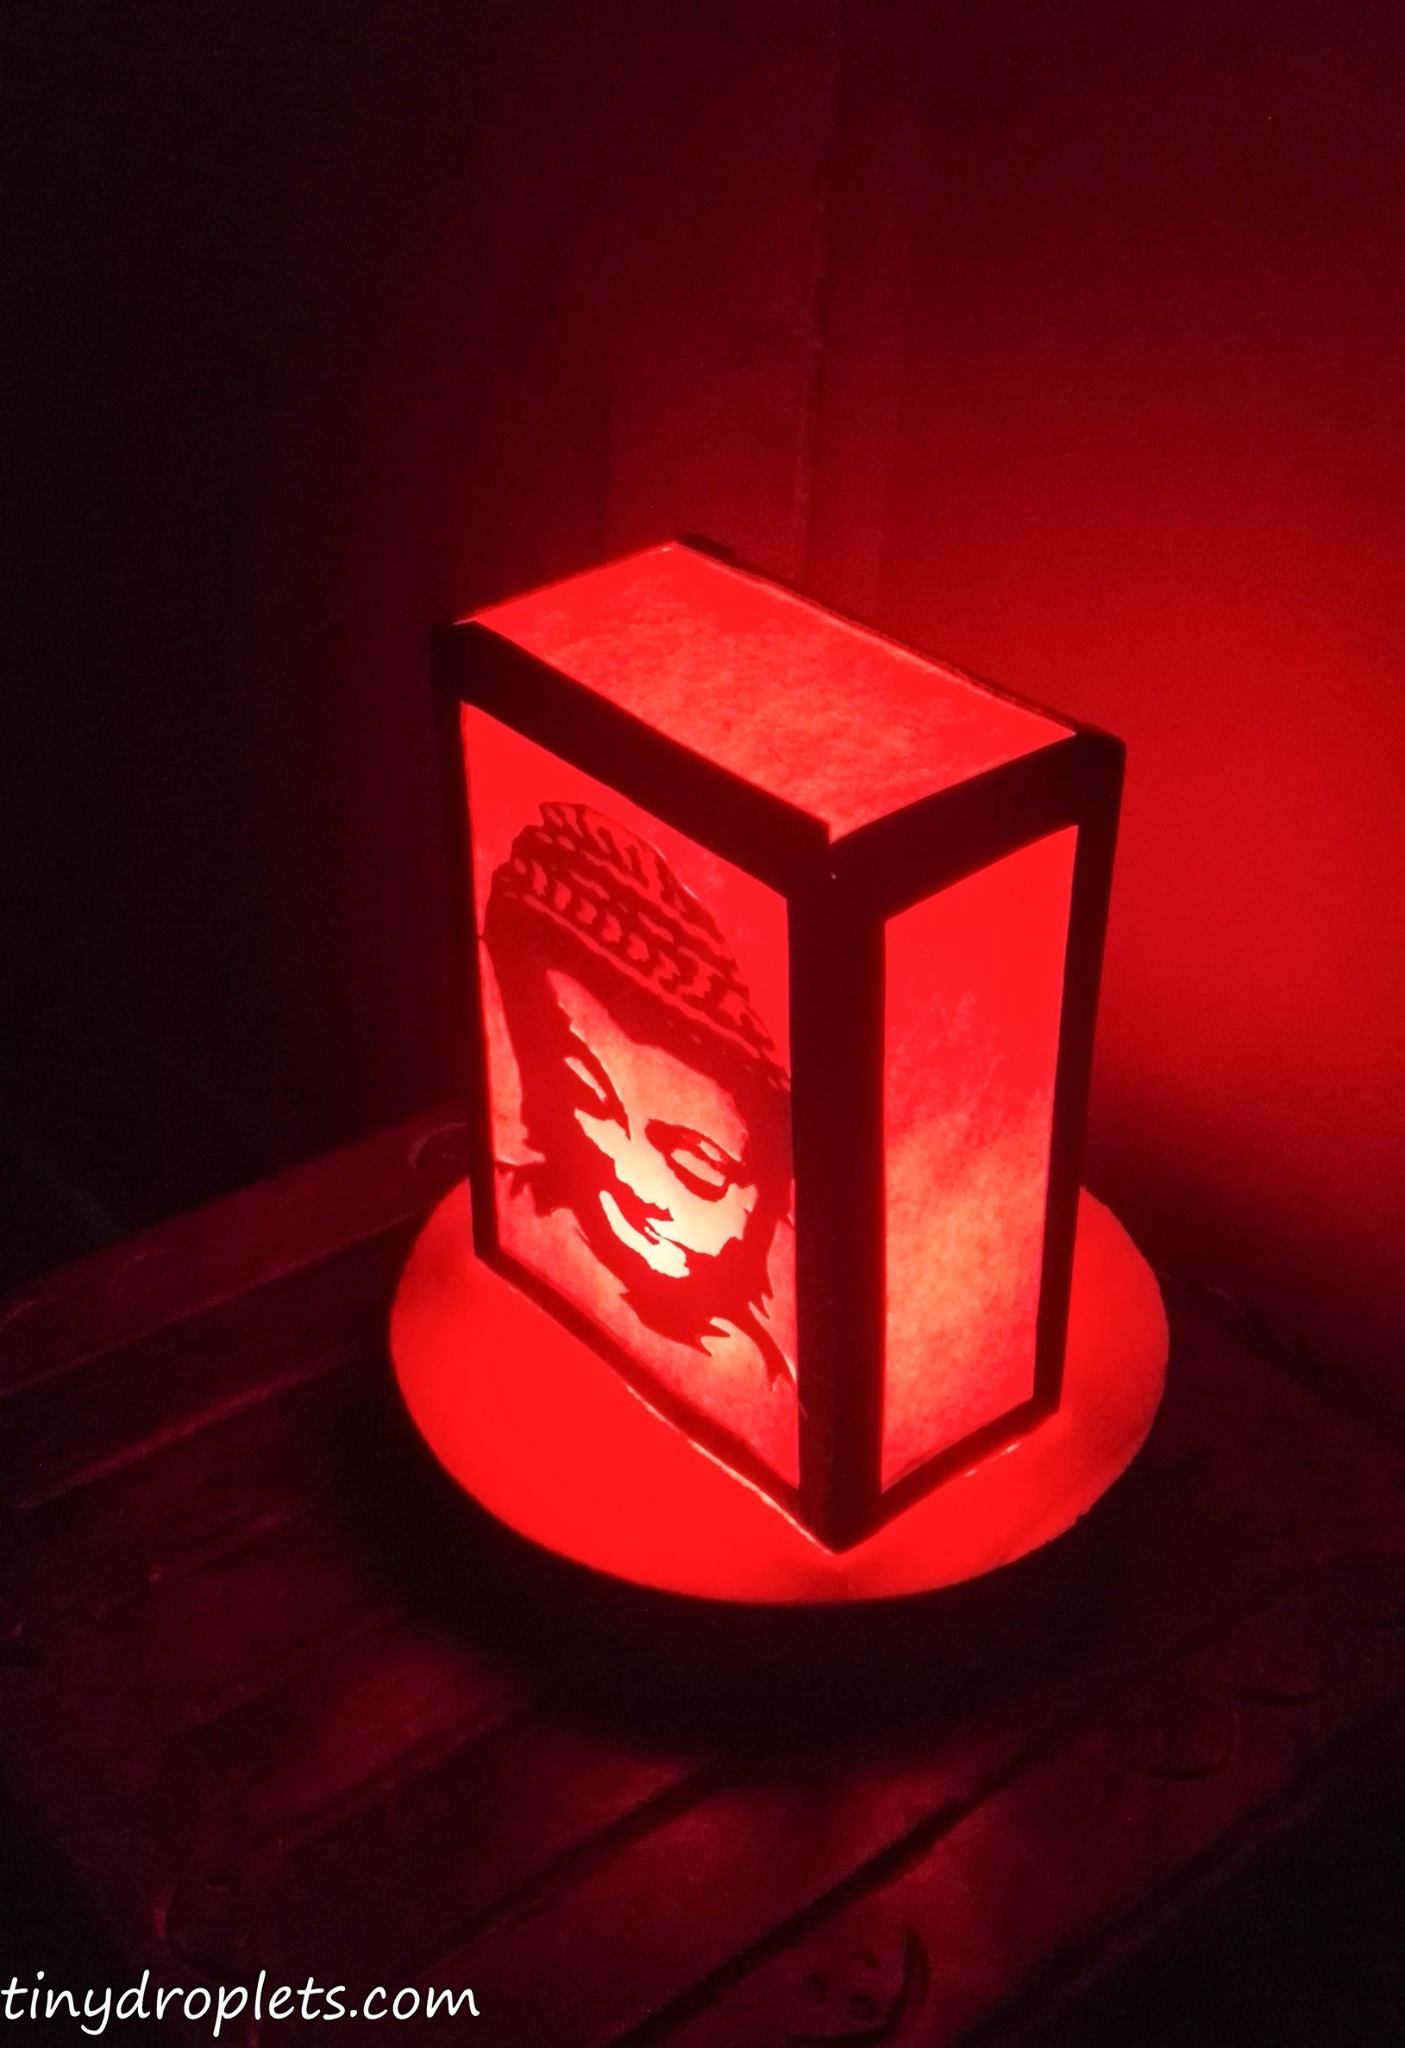
Front portion will be covered with design. I took print-out of buddhas face on an A4 sheet. Glue the design and let it dry.

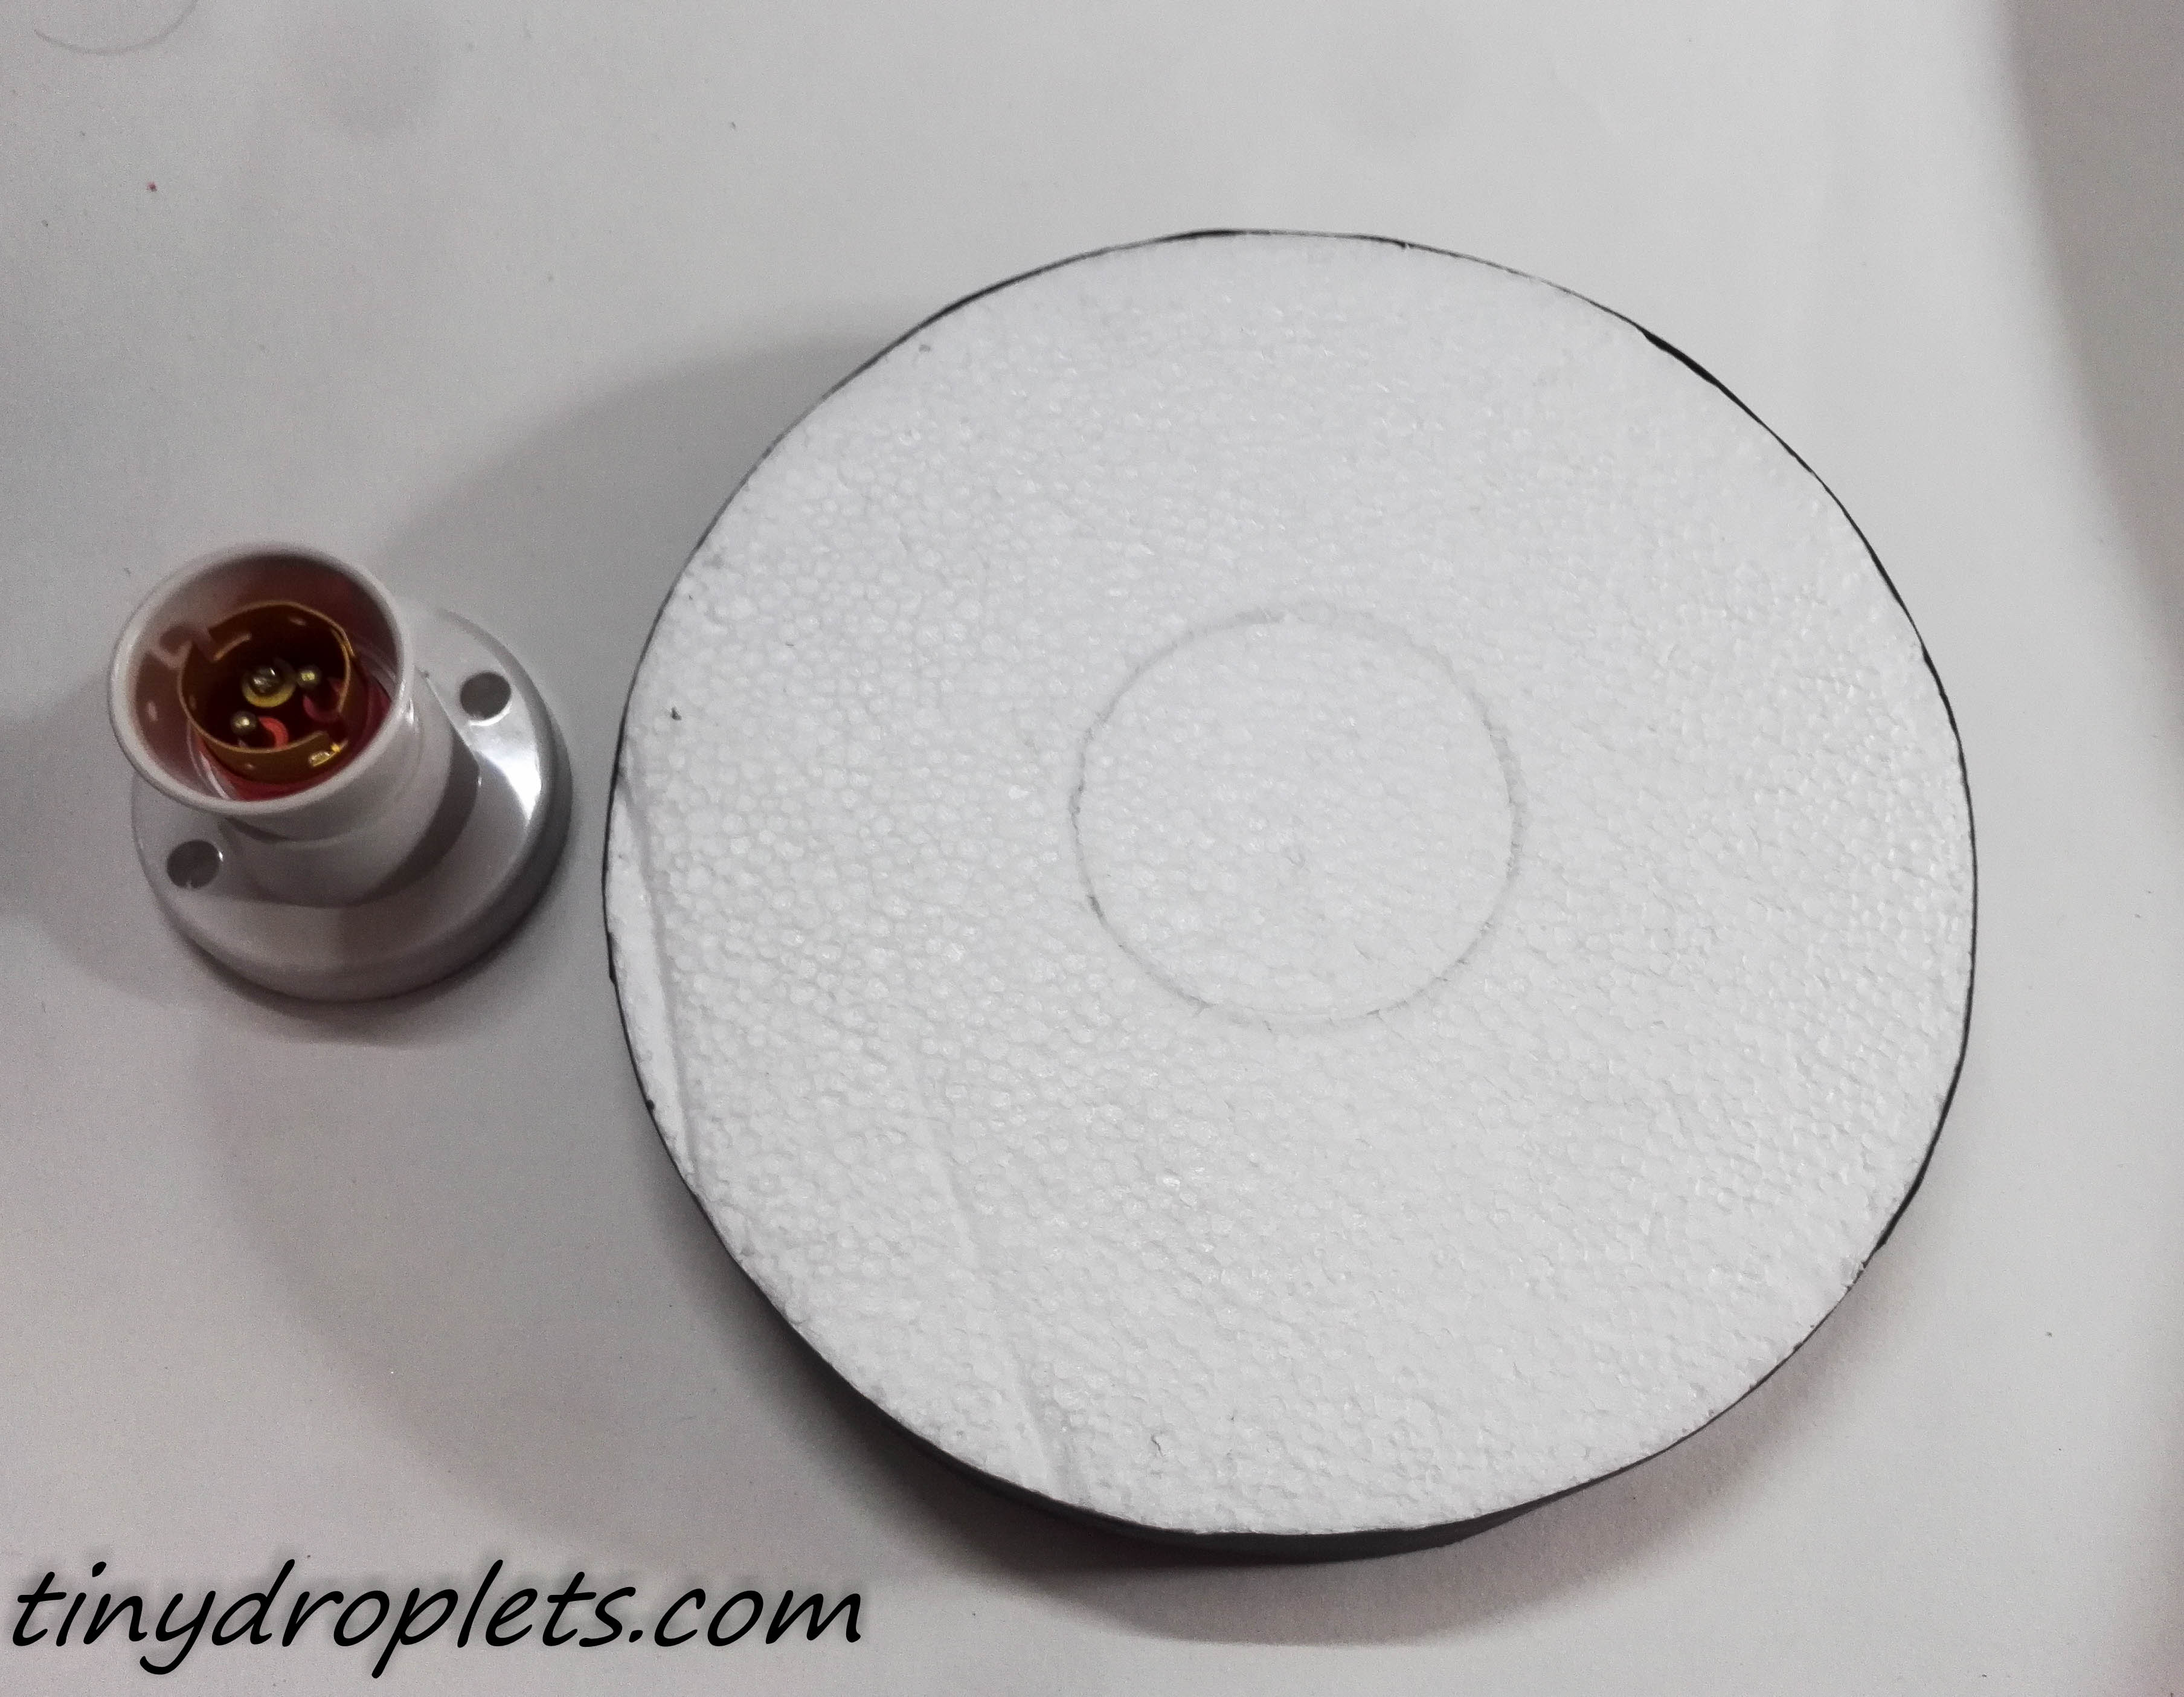
The frame is ready and its time to fix the bulb holder on a base.

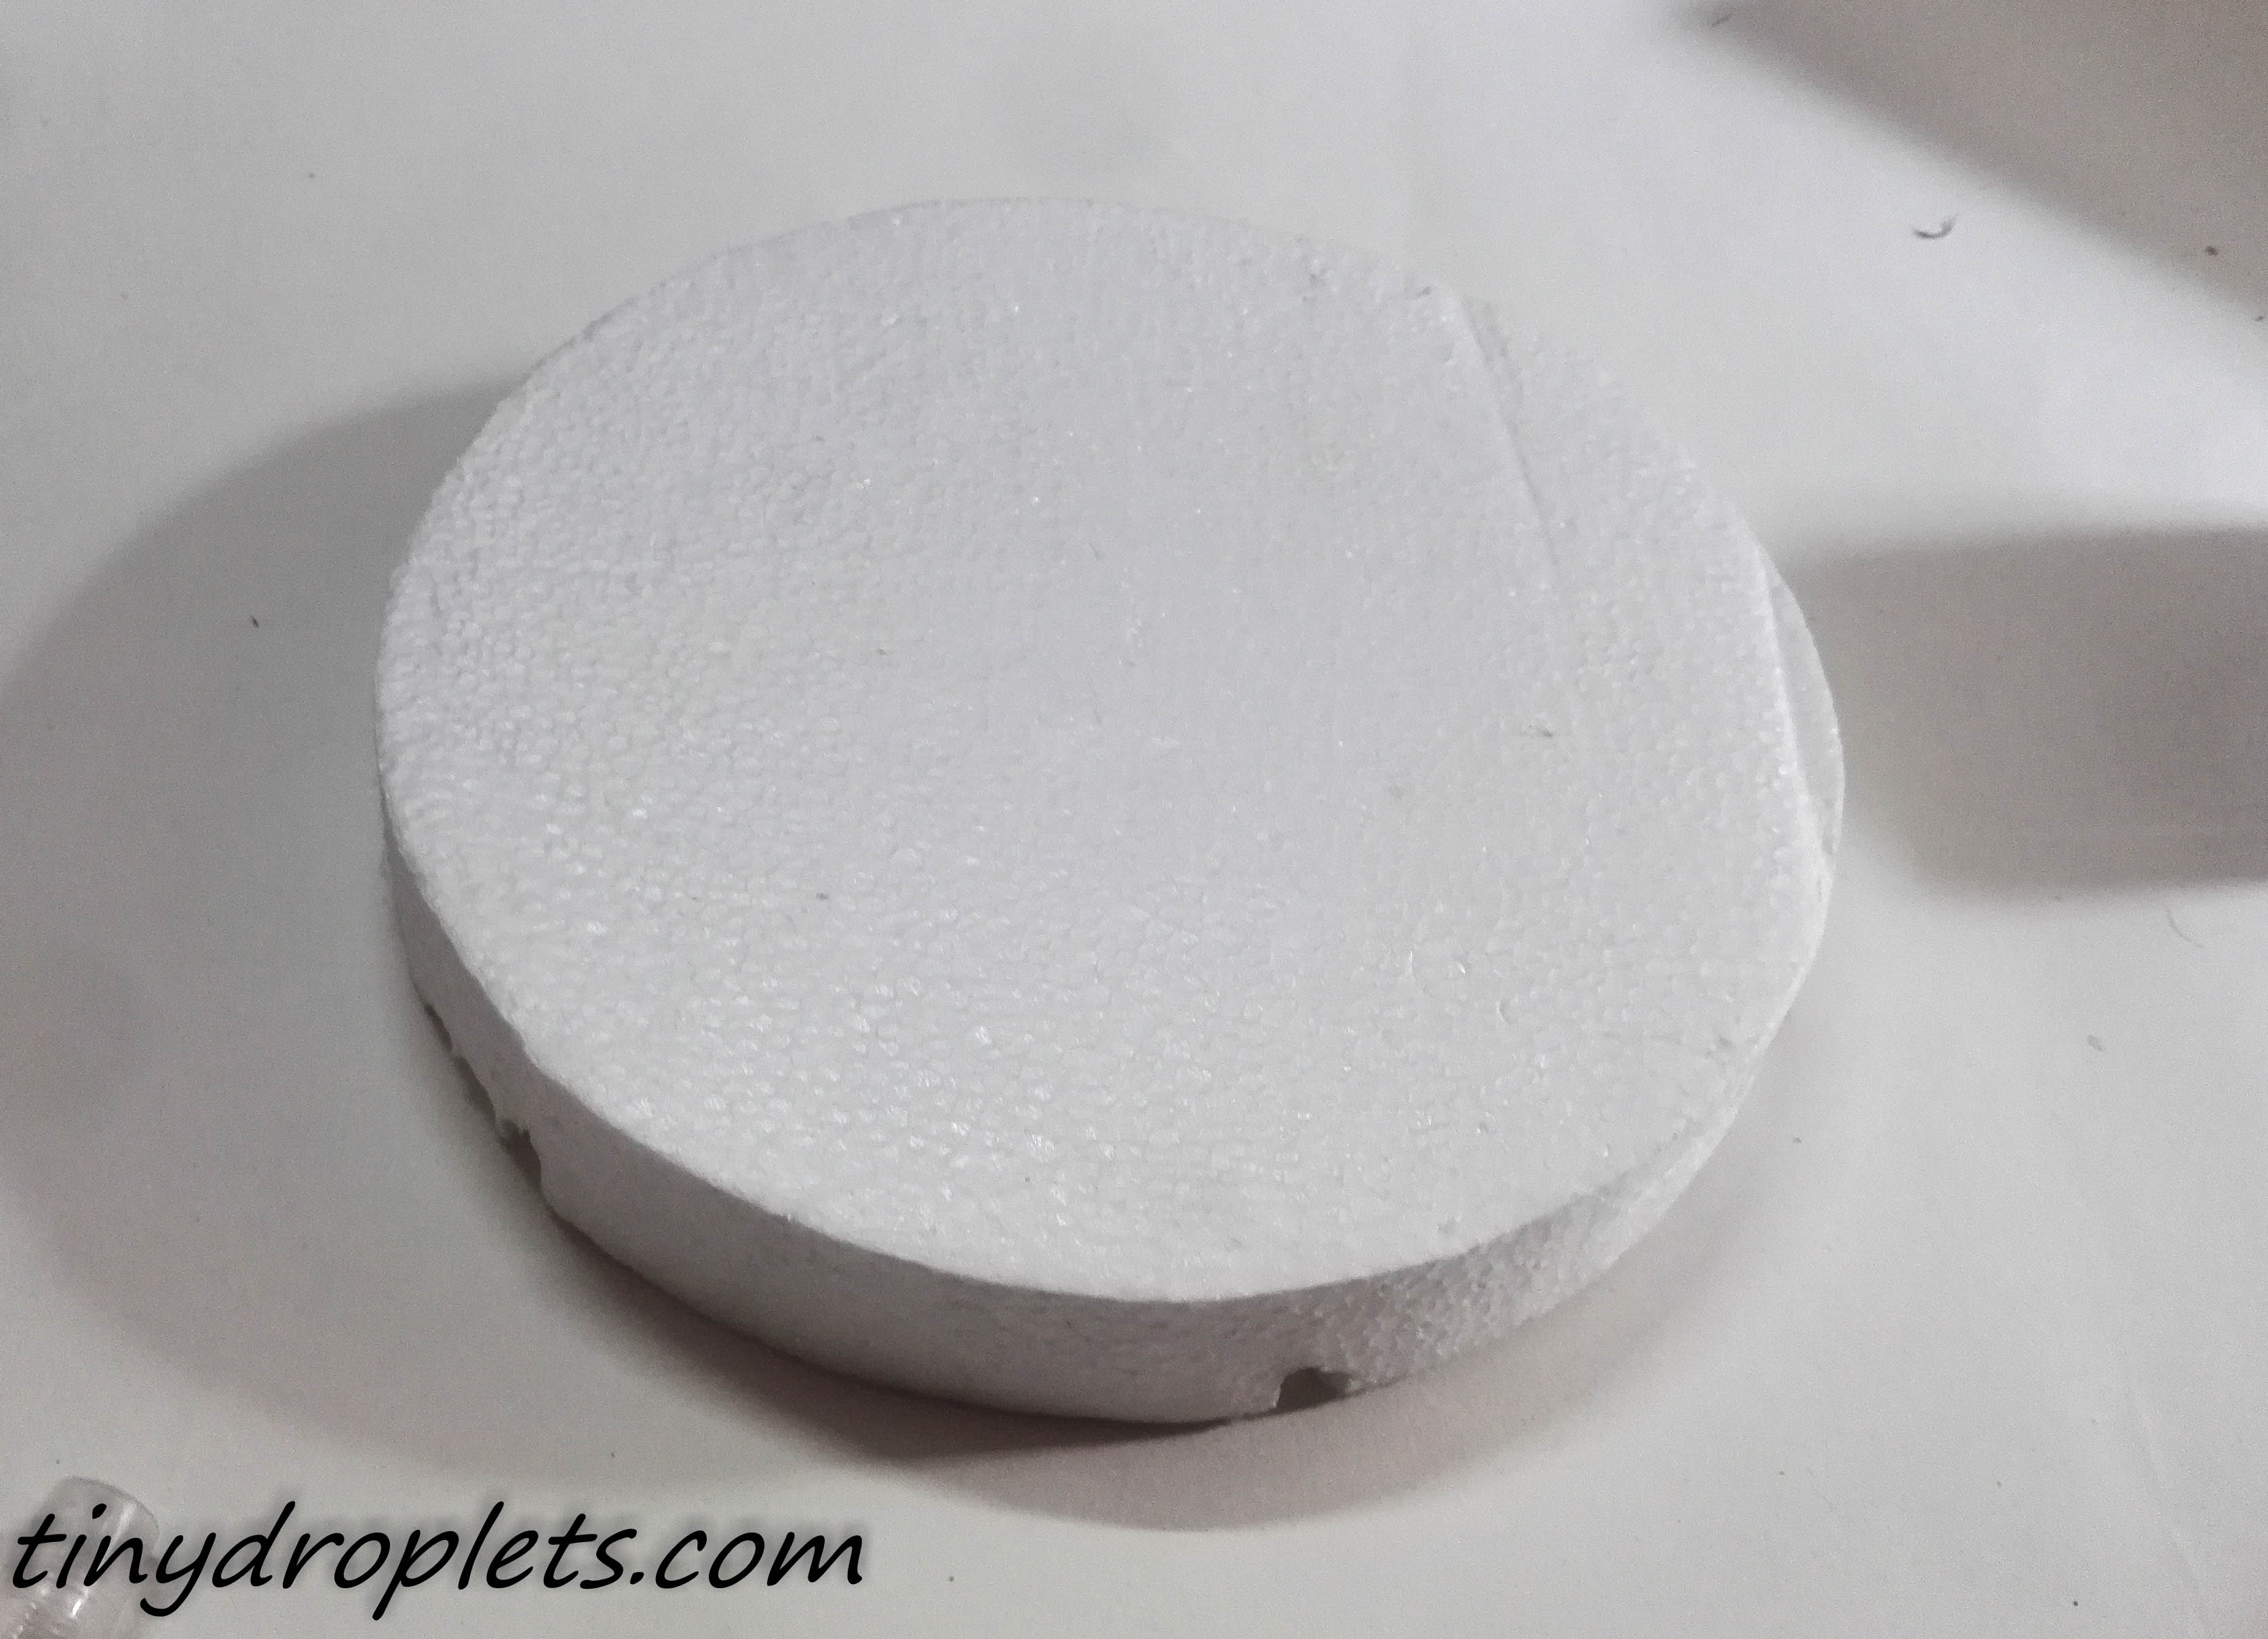
I have used an old leftover round shaped thermacol  sheet. Any form of base can be used even cardboard based but it should be thick.


Any type of bulb holder can be used. First step would be to make a hole at the center of the platform of a size to let the holder pass. Second task would be to fix the holder strongly so that the holder remains stable.


Things are almost done. Cover the holder with the frame, through the open end.


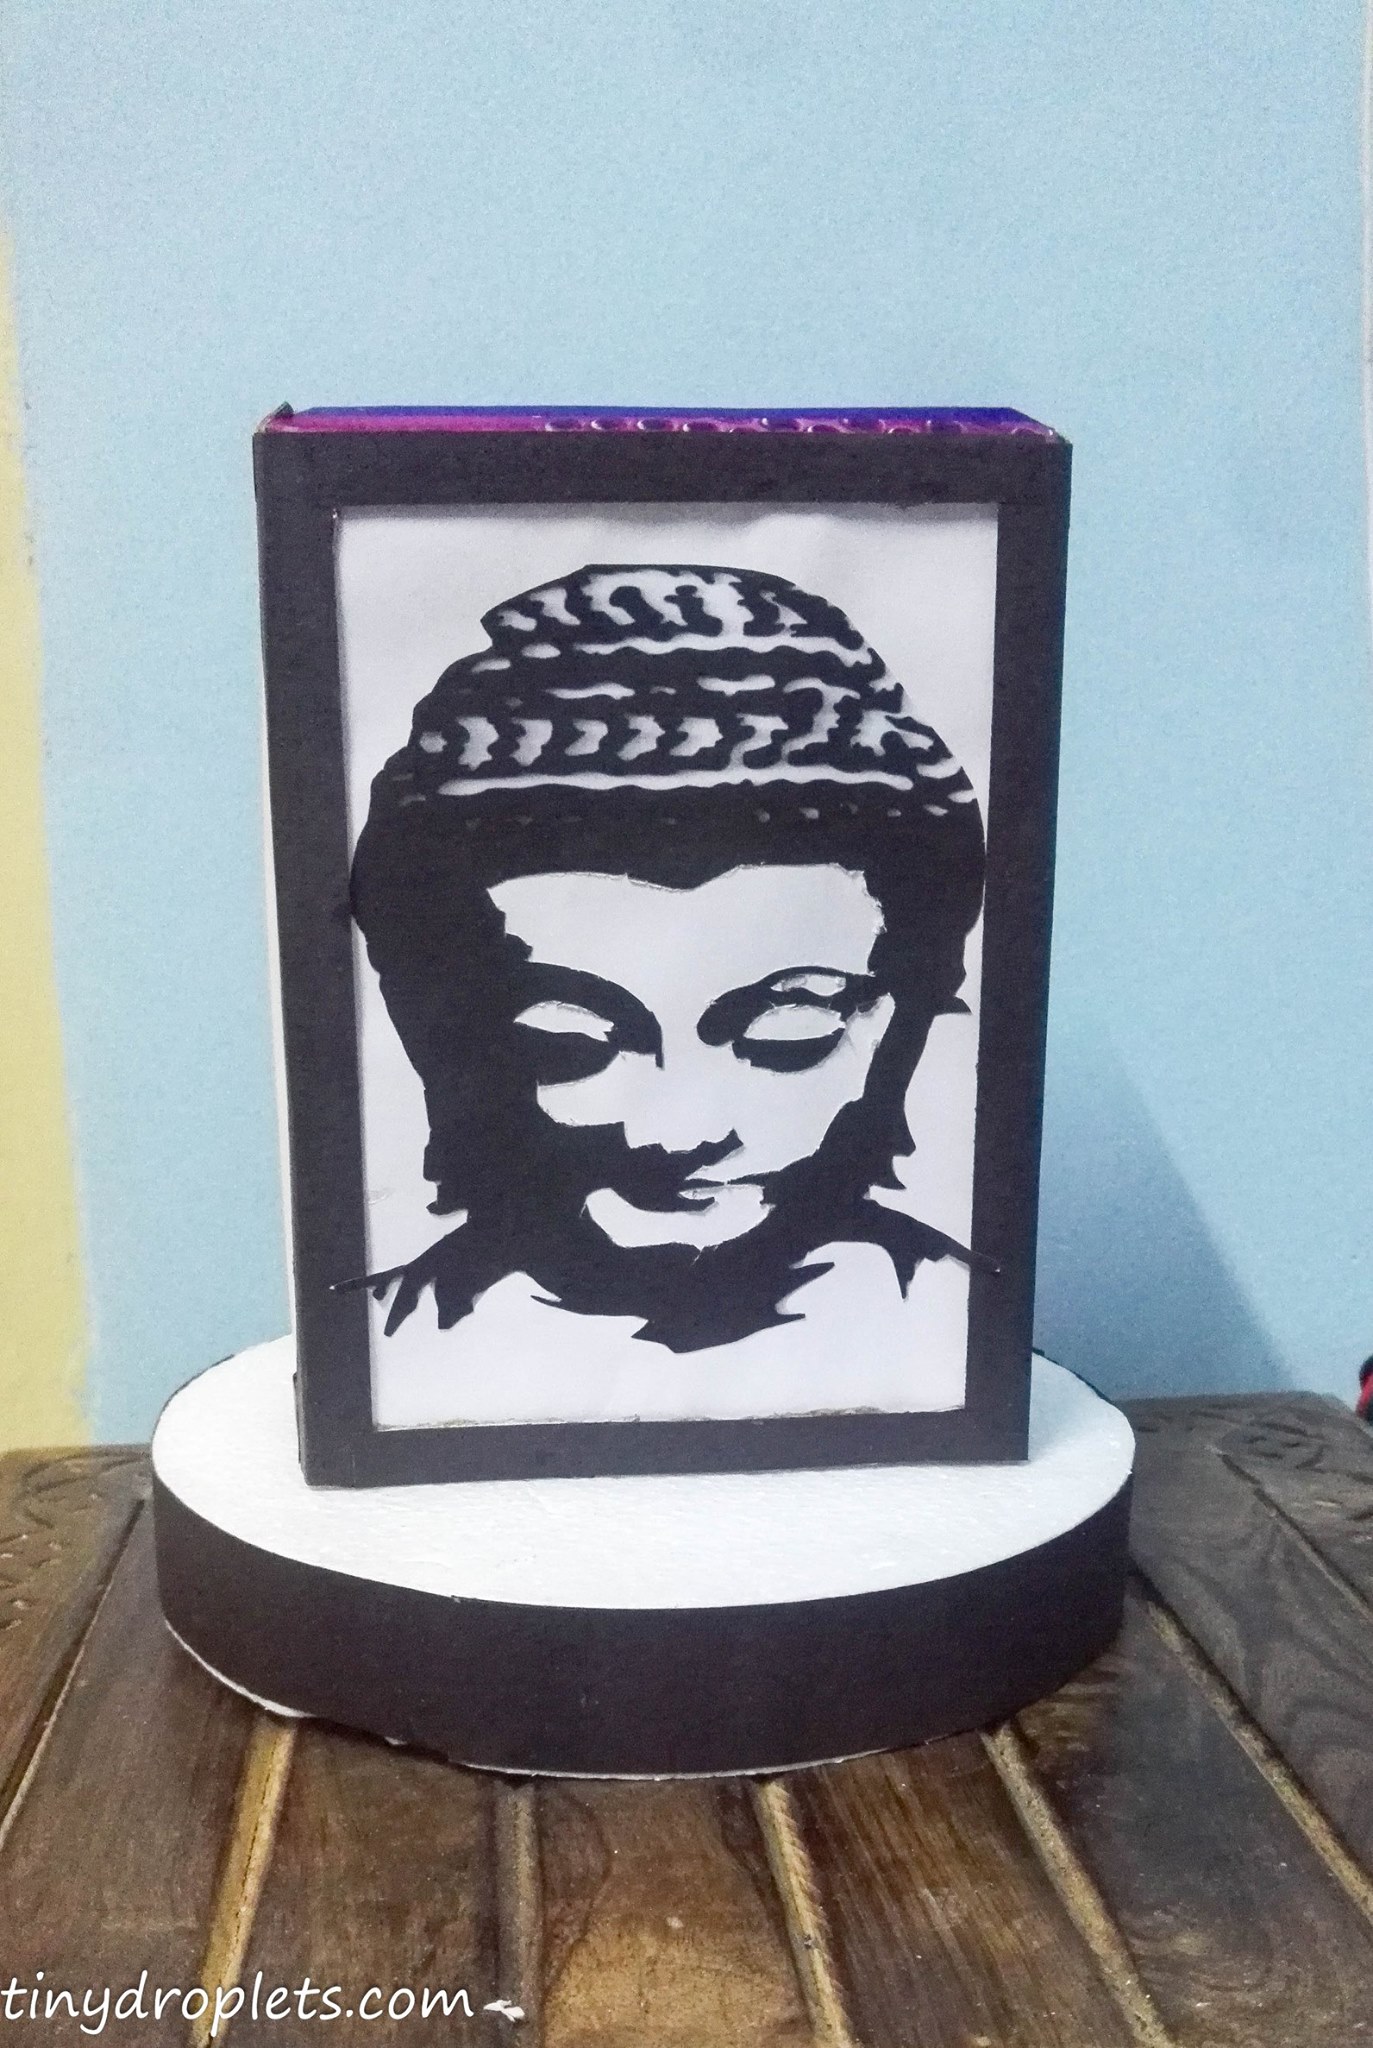
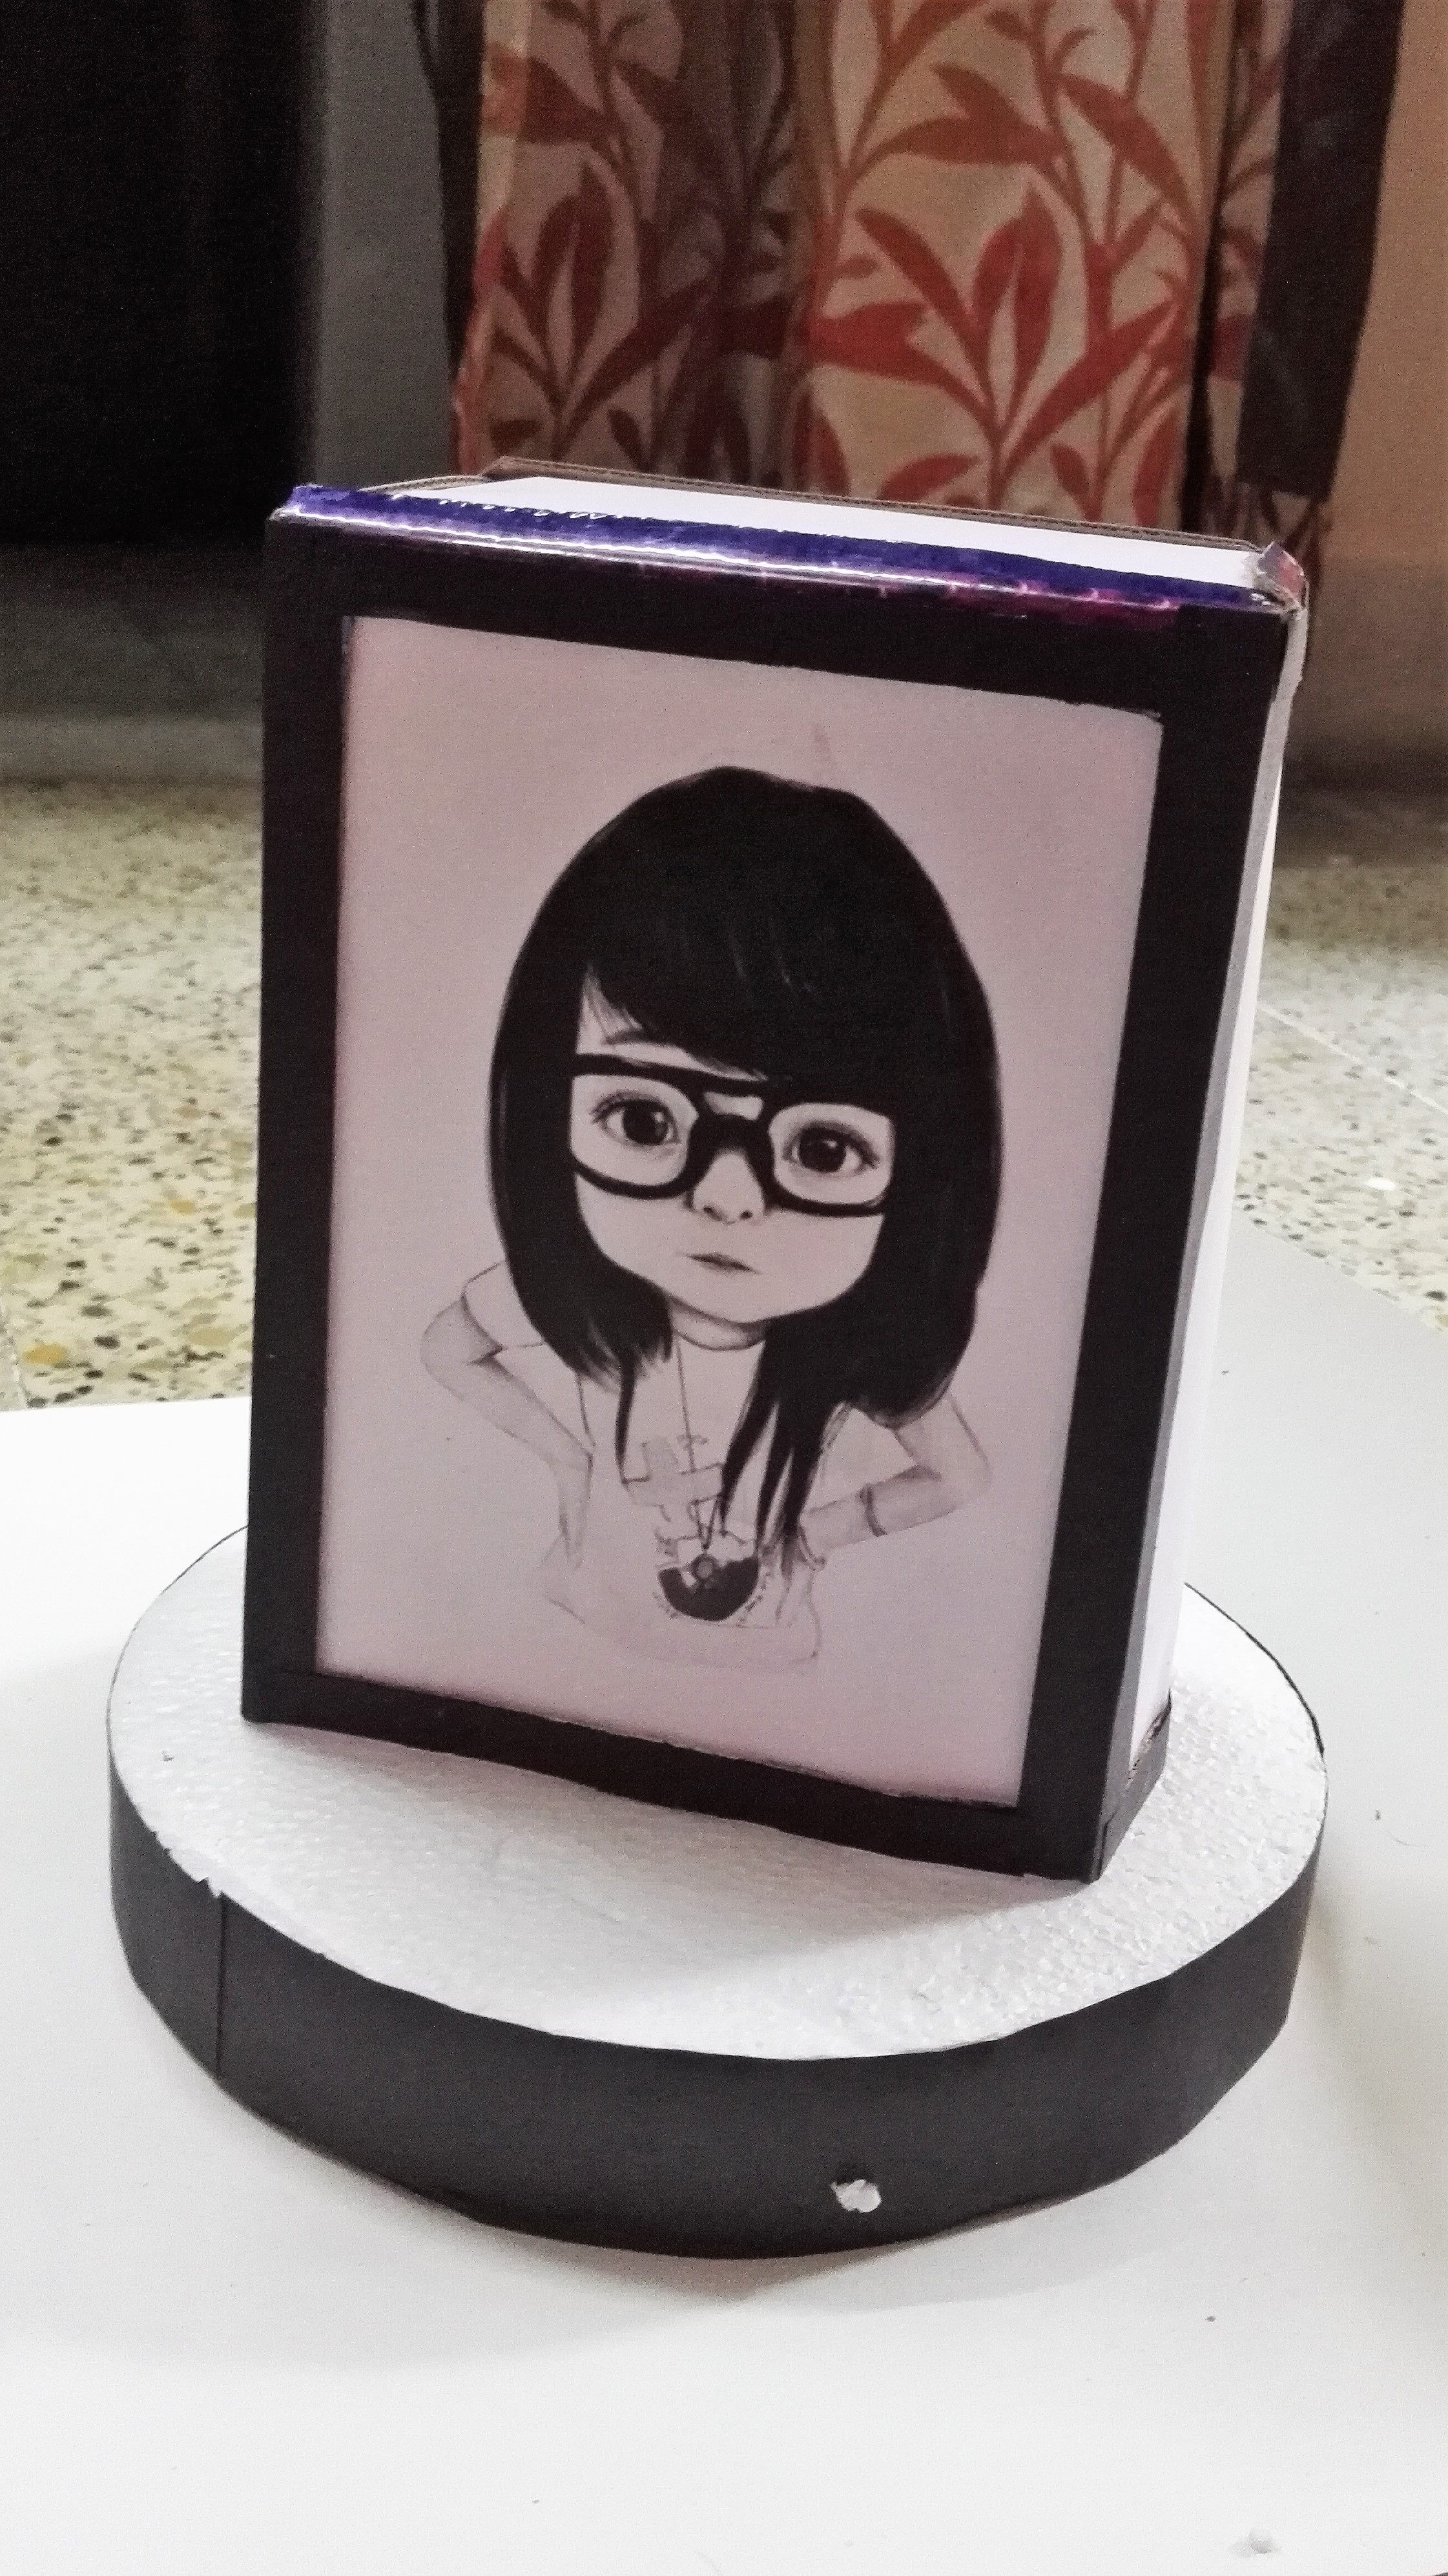
And its time for happiness to glow.


Share your handmade lamps….

Happy Crafting !!!


Easy diy magnetic knife strip

I have been looking over workaround to store my kitchen knives that would free up counter space and protect the knives’ sharp edges from getting nicked and dulled.Counter space is a precious thing for those who cook frequently and have small kitchens and also for those who hate messy kitchen counter.So here is a simple DIY project for freeing up kitchen counter. 

A wall-mounted magnetic strip is the best way to store and organize kitchen knives, scissors,chisels, carving tools, and other sharp objects. It not only protects the sharpness of the tools and maintains their fine edges, but it keeps your hands safe while you’re storing the tools, and out of the way when you’re not using them.

This is an easy diy project. And a fun activity for weekend. Lets start making one our self.

TRY IT OUT:

For this project you need magnets,cardboard roll, X-acto blade, craft paper, glue and ribbon.

For this diy try to grab a thick cardboard roll.

Make marks in the roll using the marker equal to the size of the magnet.

Using the X-acto blade make cuts into the roll.

Follow the same process and make similar holes. Once holes have been cut its time to glue magnets to the holes. Its ok if magnets remains above the surface.

Use some color.


After coloring let the roll aside to dry.Use a craft paper to cover the roll. Just use a bright colored ribbon to hang the roll at your favorite place.


This magnetic holder for your knives  will free up your counter and your kitchen drawers. Instead of having a bulky wood block to hold your knives, this DIY magnet project allows you to keep your knives out of the way. This project is also useful when trying to keep dangerous objects out of the reach of children.

Even if you don’t spend time in your kitchen, you can use magnets to create formidable wall art while storing your kitchen utensils.


Handmade gift box using duct tape roll

Using a tape roll to make cute little gift box is fun and a creative idea. You can really make something nice with this little roll.This DIY upcyle idea helps to recycle the used tape rolls and its one of my favorite DIY idea.I have been recently making them and have gifted to many of my friends at various occasions. These rolls can be turned into gift box, jewel box, photo box, cookie box and many such wonderful piece of handmade craft.

Lately I have bought whole lot of duct tapes for various craft projects. I was left with many such rolls which were ready to be thrown and it was a coincidence that I stumbled upon this idea. I love upcycle ideas and recycling these rolls if fun.Next week is my best friends birthday and as usual a handmade gift was on my list. I used an old roll and made a pleasing gift box for my dear mate.


This is just one such idea of decoration. You can play with the decoration and make beautiful stuff.

TRY IT OUT:

This alluring box can readily made using tape roll,glue,cardboard sheet(can be used from old cardboard boxes),scissor, tape, craft paper and ribbon.

We need to make two round cut-outs from the cardboard sheet. Measure the circle according to the size of the roll. If the cardboard sheet is thin use scissor to perfectly cut them, but if the sheet is thick use an X-acto blade.
Do not worry about the rough cut-outs, we will cover them with craft paper.Glue one of the circle to base of the roll and keep aside another one for the lid.


Leave aside the box so that the glue fixes the bases perfectly.

Take the second cut-out, cut a thick strip larger than the width of the cardboard circle. All you need to do is cover the width of the cut-out with the strip.
Keeping the strip greater in height will help the lid to fix completely to the box. As the strip is attached to the outer surface, it becomes larger than the box. Try to make the lid larger in size.


Once lid is finished try to fit the lid to the box.


Now you are just left with the task of box decoration. You can use your creative way to make this box look perfect for gifting.

I used golden craft paper to cover the base, wrote message on the inner surface, attached a heart cut-out and used a polka-dotted red ribbon to pack the box.


I loved making this box and my friend loved her birthday present.


diy valentine photo puzzle with popsicle

If you have been looking for an inexpensive handmade gift on this valentine then I think these Popsicle Stick Photo Puzzles are perfect! This puzzle will make your date fun filled, let your partner open the gift box and see him solving the puzzle. Use your favorite pics and relive your memories.


This fun DIY project works for kids or adults. This idea had been at back of mind since ages but I am glad that finally it took shape. When in a relationship you always try to keep your gifts unique but soon gift ideas start exhausting and you really try hard working on it. I love gifting and to me handmade gifts not only expresses our love but also the effort that we put in.

When you start making your own Popsicle stick puzzle you will not only find it easy and inexpensive, but you will feel that the beauty of the project is that you can make it so personalized and really perfect for almost any age group. You could use anniversary photos,family photos, post cards from favorite places, print outs of characters, sports teams logos, etc. Depending on the difficulty you’d like the puzzle to be, you could vary the size of the Popsicle sticks. You can even make the puzzle two sided! The possibilities really are endless! 

Lets get going..

TRY IT OUT:

For this project you need photos,popsicle sticks,glue(I used fevicol),colors and X-acto blade.


Never mind if the sticks are dirty, only thing to be kept in mind is to choose sticks which are straight and plane. Rough surface sticks will leave frame uneven.

Once supply is arranged, start coloring the sticks. Use bright colors as it gives a vibrant touch. I have used black marker pen to draw hearts over it. You can keep the base color simple or add designs of your choice. As I was making it for valentines so thought of making heart designs all over it.


You will get time to relax before the sticks completely dries up. These sticks should be left aside to completely dry or else you might end up spreading it from your sticks to your fingers to the photos.

Arrange the sticks into a horizontal stack. I simply arranged them, you can stick tape at the back so that sticks dont move apart.


I have used a photo collage, this is gonna help me to make two puzzles. You can either choose to make collages using Picasa tool or make separate puzzles.

Apply adhesive to the back of your photos and stick to the base. Press it a bit or lay some weight over it, this will help the pic to stick perfectly.

Once dry, carefully use an X-ACTO knife to cut in between each popsicle stick. I definitely recommend doing this on a mat of some kind and also, recommend cutting from the back since it’s easier to see the divisions between the sticks!

That’s it! Then, you have awesome personalized, unique, handmade puzzles perfect for Date. Just bundle up this little gift of love.


If you want, you can add a secret note on the back! Enjoy gifting.

Creative diy handmade bookmark idea

This is the perfect treat for all the book lovers out there. Here is star filled night theme bookmark which is adorable and truly a perfect present for the book lovers. The best part about this DIY project is that you can use material you have around your house, they’re easy to make and who doesn’t want a personally, custom-made bookmark?
I have been a book worm ever since I learnt to read. My husband is the same, we have different taste in different genres of books, while travelling or during holidays we make sure to carry our favorite books with us. We have a good collection,floor to ceiling bookcases, brimming. We are quite old-fashioned I suppose, no e-books or Kindles here, we both like the solid feel of a book and the pleasure of turning real pages.
Along with reading I do take out time for crafting. I hate to go shopping for things that can be handmade…I ordered a new book and before its arrival I planned to make few bookmarks for me as well as my husband.
Just check this cute bookmark idea.


I stumbled upon this idea while reading a magazine on a dark star filled night. The twinkling light of the moon peeped through my window all over my reading desk.

TRY IT OUT:

For making this bookmark you just need card-stock,silver pen and a blue ink bottle. I wanted to sit down and start working and so I used things which are available at my place.

Lets start. Cut the  card-stock to the size that you would love for your bookmark. Take a painting brush, dip into the ink bottle and just color the white sheet. Leave the paper to dry for 10-15 minutes.

By the time ink settles down, take another paper and make cuts outs in the shape of moon,stars and cloud.

Glue the cut outs to the bookmark, you can even use doubled sided 3-d tapes as the cloud and moon looks better in a pop-up design.

Complete your bookmark with small hand drawn stars an a quote…make your choice of quote. I have used “I am a bookworm” and “You are my favorite daydream”.


These little bookmark are so fun! They are really cute, unique, and useful, and they make great gifts for all ages. It’s also a fun project that doesn’t take hardly any time or money. You can’t beat that! 


House of cards-book review

House of Cards
Sudha Murty
Fiction,Cultural-India
Penguin Books India pvt. ltd
2013

Sudha Murthy is known for her subtle writing. When it comes to storytelling she is a gem at portraying the delicate facts about human relationships. One of her themes relates to husband wives intricate relationship issues and ‘House of Cards’ is based on this theme.


Murthy’s novel portrays a character Mridula, a young and beautiful girl who is full of life; she goes out of her ways to help others. She hails from a small village in Karnataka and is grounded with values.
Mridula meets Sanjay, a talented but impoverished doctor, they both fall in love. Mridula ignores Sanjay’s physical deformity in hand and marries him. They settle in Bangalore. They face hardships in beginning still they survive with each other’s support and love. Time doesn’t remain same and sadness brews in Mridula’s life when Sanjay quits his government job and starts an immensely successful private practice.
This story revolves around Mridula, Sanjay and their family members. This is story about life of a widow woman- Sanjay’s mother who survives the hardship of life by becoming a shrewd moneylender. This is story about Sanjay ‘s sister and brother-in-law who live a pretentious life and publicly parades themselves, their possessions, and their accomplishments, this very thing leads to debt and treachery. This story is about Mridula’s parents who live a contended life in their village and finally this story is about Sishir, Mridula’s son who lives a lavish life but comes face to face with reality when he meets a young girl named Neha.
The more Mridula sees of the world, the more she realizes how selfish and materialistic people can be. But she does not take the ups and downs of life to heart, and lives each day with positive energy. Sanjay’s ambition blinds him towards humanity with opulence comes the incessant desire for more, and the inevitable slide into corrupt practices. For a long time, Mridula has no idea that Sanjay has traded in his soul; when the truth hits her, she has no recourse but to walk out on him. But can she really find a space of her own? Can she become old Mridula again? Was her house of love mere a house of card? This intricately woven novel explores human relationships in telling detail, and holds up a mirror to our society with honesty and with conviction.
The story starts with a dedication “To all the Mridulas who suffer silently.” And with this line Murthy reaches out to those women who are suffocating inside their marriage which has been woven with selfishness. It gives the strength to all those who wants to put an end to life sucking misery of marital relationship and purse the path of happiness and contentment.

A House in the Sky by Amanda Lindhout

A House in the Sky
Amanda Lindhout
Biography, non-fiction
Scribner
September 10th 2013

An amalgamation of bad fate and ones strength to survive against all odds.Its a memoir of Amanda Lindhout beautifully portrayed by words of Sara Corbett.


The story completely revolves around Amanda the protagonist of this novel.She is perky and vivacious, she wants an adventurous life; a life spent on her own terms, her quest of traveling takes her to Latin America, Laos, Bangladesh, and India, and after that went on to Sudan, Syria, and Pakistan. In war-ridden Afghanistan and Iraq she carved out a fledgling career as a television reporter.
Amanda managed to travel with help of her hard earned money working as cocktail waitress. Each tip saved made her decision to traverse the globe more firm.

Her life crumbled into small pieces in August 2008 when she traveled to Somalia—“the most dangerous place on earth.” She along with her friend was abducted on 4th day itself.

Amanda’s 460 days of captivity is full of gruesome act by Somalian captors, her conversion to Islam, her contact with Quran(only book at her disposal), deceive by own friend and unending pain.

This novel has a great message;to fight till your death. There was no ray of hope but still Amanda survived ghastly 460 ill fated days of her life.

Diy photo fridge magnets

Gifting is fun and a fun filled gifting include two things ‘handmade’ and ‘photos’. Here I’ll show you how to make photo magnets: An easy & inexpensive DIY project which you gonna love unconditionally!

My best friend’s birthday was near and I stumbled upon the idea of fridge magnets, when purchased online its bit costly but its a cheap DIY project and requires limited supply. So I thought to give it a try.

TRY IT OUT :

For this project you need photos, foam sheet, A4 magnet sheet, scissor, glue gun.

I printed the photos on a photo paper with a black background.
Use an Xacto and a straight edge to trim your images nice and neat.Scissors work well, too!

Once you are done cutting the images, stick it to the foam sheet. Leave some space in between so that cutting them using scissor becomes easy.
Using foam sheet as a base is an optional step. Photos can be glued to magnets directly but  foam sheet gives a good base to photos.

TIP: In the end, I found it will be good to leave a little border around each image. If you like that look, measure your foam board 1/2″ larger than your images, leaving a nice 1/4″ border on all sides.

Leave the photos aside for a while so that it dries perfectly, you can put weight over it for the same. Let them dry all the way before moving on. Make sure you have complete contact between the image and the board. If not, the edges will curl afterwards.
Cut strips of magnet sheet to your desired length. For non-adhesive magnets, use a hot glue gun or superglue to put them in place, and apply in to the back of your images.

Once it’s dry… you’re done! Pop your magnets on your Fridge, File Cabinet, or any other magnetic surfaces… or give some as fun personalized Photo Gifts!

I can’t even tell you how easy this project is….this makes such a great gift idea too!  My friend absolutely loved opening these up on her Birthday morning.


heart shaped card

The moment you decide to gift something to your sweetheart on valentines day, you start deciding upon heart shaped goodies. For people like me who love making handmade gifts there are plethora of unique, heart-shaped DIY crafts to choose from…..make heart-shaped pillow overs, heart-shaped wax crayon hearts, heart-shaped bookmarks, heart-shaped tea bags, and many more…..

If that’s too cheesy for you, you can also show some heart-shaped romantic love in the form of heart-shaped fold able card.


12998252_10205877255845570_4111327391585601220_o


This card looks amazingly beautiful with star-full night theme. Cute little teddy sitting on the moon displays perfect essence of love.

On this valentine day, the card can be an awesome idea to surprise your partner. One can write message or stick an old time pic inside the card.

TRY IT OUT:

This is an easy project. You need to gather paper, blue ink, glitter pen, scissor,stickers and ribbon.

Start by drawing heart shape on a paper.


13063009_10205877258445635_6946797124154481015_o


Cut the heart shape which was drawn. Trace the outline of the heart, now fold the heart from center and trace the half heart edges as shown. Its necessary to keep the angle between the two hearts same, this is important to fold the hearts equally.

Once outline has been traced use a scissor and cut out the figure. You will see that the two halves when folded upwards covers the middle heart completely.

Now its time to paint the heart. I have used blue color ink inorder to give a dark night effect. Use a paintbrush and with light strokes color the card completely inside. Keep it aside to dry completely. As Ink is very thin liquid don’t apply many coats as the paper may start to wither.

Using silver sparkle pen write some message and draw small stars.


doop


Once Inner portion is complete its time to decorate the cover.

All that I have done here is take few craft papers and stick to the two half’s of the heart.  After that I punched two holes at the center of the heart towards the opening portion. Glued lovely cartoon characters and tied knot using a ribbon.

Lay aside the heart and cut another heart 1 cm bigger than the previous heart. Here I have cut a heart using a red colored craft paper and it perfectly matches the background. Now all that needs to be done is some sticking….. glue smaller sized heart onto the red colored heart….you are ready with the lovely gift in no time 🙂 🙂


Glowing Photo Luminary

In my free time I love to look at my old photo albums, they not only remind me of people but also of the beautiful memories of those days..Photos are everyone’s favorite possession these are wonderful moments captured on a paper..

13502959_10206239597503885_2412434317991867024_o

Its weekend again and this time we have a get together at my place, this morning I have been thinking of decorating my place in a different style.

When I was looking at my drawing room I observed the area which was ignored always and it’s the table space, whenever I looked at it I always kept pondering over ideas that can make table space look as the most elegant area but failed to come up with something exciting. Finally I stumbled upon a fun, easy, and inexpensive way to create a personalized decor piece that’s perfect for a centerpiece during a special family meal, or just to lighten up during night time.

I have been making many projects using old time pics. Among other thing that I still love, what I love is having flickering candles on the table. Here is an elegant piece of art created using meager items. These are glowing photo luminaries.


13502562_10206239595223828_5913676419745929264_o


TRY IT OUT:

For making such a beautiful luminary one for yourself, things that you need to collect are scissor, both sided tape,wax or butter paper and glass tumbler of different shapes and sizes.

Glass mason jars, flower vases, and pots work great.  Try however, to avoid irregular shapes.  Squares will work, but the  best ones are smooth cylindrical shaped glass. I found few glasses at my disposal which I used in my project.


13517667_10206239594543811_8370271095720499071_o


When you look at the pic above you see photographs printed on a translucent paper. All that I have done here is collected pics taken throughout the year and used my photo printer to print some of my favorite family photos onto wax paper.  You  might have to experiment with your own printer to make sure it can print onto wax paper, but most inkjet printers should work. First take a print for testing and make out whether the ink is spreading out or not.


13522911_10206239605024073_3491373501192404137_o            13483329_10206239606104100_8666007268287532971_o


All that I did here was select some pics and make a collage. Once I have made a horizontal collage I saved it and imported it to word. I changed the opacity of the pic little bit so that the image can get a washed out look. I didn’t use washout feature directly as the pic gets too light shaded and wont look good when printed.

Once I was done with the editing I printed the pics on a wax paper, I used A4 sized paper and it easily passed through the printer. Prints looked as shown.


13475216_10206239605464084_99718323272477247_o


Trim your photos to the proper height of your glass. I left some space at the edges. Before taking the printout make sure the exact size that would fit to the glass tumbler.

Make sure you have clean wiped the glass. Take the both sided tape and start sticking it to the glass .


13497674_10206239596423858_2728910535138331762_o Simply attach your photo to the tape.  For larger containers, you’ll need more than one photo to cover all of the sides.  Just have them meet right up in the middle of the tape for a seamless look. Photo collage fits best.


13517630_10206239595663839_8464426909323550179_o


The fun part is that these little luminaries look beautiful in broad daylight.  Set on a windowsill or on a table, the light pours through them and naturally makes them glow!

I used cylindrical glass but you can play around with a variety of sizes and group them together for a fun display.


13502874_10206239601103975_1941857847377717113_o

13490736_10206239601503985_7848563653542363458_o


Its not only going to be beautiful display but at dinner this would also be the topic of conversation.


If you have a crazy obsession with scented candles, these little glass jars work beautifully for this project.  The lower the candle wax, the better, so if you’ve got some almost-empty ones, they’ll work perfectly!


Apart from candles  you can also use a battery-powered tea light and use these for night lights!


13517505_10206239597543886_7798328582663250947_o


The real magic happens when the lights go dim, and the candles start burning.  Place a few tea lights in your glass containers and see the hue around you.


13495430_10206239600623963_5358774320195042387_o


The soft light pours through the wax paper and illuminates the photos, creating a beautiful work of art! The translucent paper gives an awesome effect to the candle lit tumbler.


13502959_10206239597503885_2412434317991867024_o


I lit the dinner table with these glass tumblers and people couldn’t stop looking at them and admiring them. Start thinking about your own family memories you could light up!

Candles does the trick and everything come alive with a flickering glow.